
Sitting here, wrapped in flannel pyjamas and a Shetland shawl my Mum gave me for Christmas (and maybe feeling groggy after a late night and a little too much bubbly), I'm thinking about all the things we have planned for this year. I'm also thinking about all the things I learned last year, which will help me make this new year a good one.
This Winter is going to be busy for us! Next week I start French classes, after 8 years living in a French-speaking province. I don't remember much from the French I took in school, and my accent in atrocious, but I feel like it's time I made an attempt at learning this language. Lev, my older boy, will be starting gymnastics and swimming classes soon (the pool cleverly combines them, so I only have to get him to one place for an hour a week). My husband will hopefully be taking portrait classes, something he's been wanting to do for years. At the end of January my Mum is coming for a visit, and my husband will be flying off on a trip to China! (I know he's excited about that, but goodness, it's so far away). My husband's parents will be visiting near the end of Winter, so I finally get to meet his father. We also have a family vacation planned, to somewhere warm and sunny!
On top of all this, I've been wanting to overhaul the blog for a few months now. I think it's time for a new header, some brighter colours, and a more functional layout. I have a couple of ideas for new patterns I want to get done before the Spring. I'd like to start on a couple of collaborations with some friends (it's so nice to know talented and inspiring people, who are also willing to listen and help with my ideas). I've also been meaning to make video tutorials for several techniques I use, but I'm not sure if I'll get to those, since I'll need help. Maybe I'll save those for the Summer.
And we'll continue to be busy for the rest of the year, with house renovations, lots of hiking and swimming, and maybe some other new designs for you.
Some of the things I learned last year, which I'm sure will help make this year successful (and all the years to come): I am responsible for making myself both miserable and content, and I get to choose which. Even if I don't start out with the strength and skills to deal with something, I can learn them. Balance in all aspects of life is one of the most difficult things to achieve, but the most worthwhile goal I can imagine. Old friends are worth hanging onto, even if our friendship has changed over the years. New friends are worth cultivating, if I carefully choose a few who will enrich my life. I need to be creative to be happy. Each moment will only exist once, so I will savour and remember the good ones, and know that the bad ones will pass, and I can let go of them.
I hope this year is a good one, for all of you.
Tuesday, January 1, 2013

Wednesday, December 12, 2012
happy birthday, Lev
I'm been super busy sewing and knitting gifts for family and friends, so I don't have much to show you right now. I hope you're all enjoying the holiday season! I've also been trying to keep things under control, despite solo-parenting for a week, various people being sick, parties to organize, cook for, and attend. (But I imagine life is like that for many people, at this time of year). In the middle of all this, my first son Lev turned 4 today!
Here he is, a few weeks after he changed my life forever. There was no way to know what sort of person would develop out of that tiny, sleepy baby.

Today I know that he is sweet, loving, silly, courageous (but cautious), smart, and fun. He is as good a big brother as I could have hoped. He loves throwing balls and frisbees, playing in the snow, and will happily go for long walks (especially if there is water and a rocky beach at the end). His other interests change from week to week, but that keeps life interesting. I'm sure he'll grow and change just as much in the next 4 years, but hopefully he will always be these things that I love most about him.

Here he is, a few weeks after he changed my life forever. There was no way to know what sort of person would develop out of that tiny, sleepy baby.
Today I know that he is sweet, loving, silly, courageous (but cautious), smart, and fun. He is as good a big brother as I could have hoped. He loves throwing balls and frisbees, playing in the snow, and will happily go for long walks (especially if there is water and a rocky beach at the end). His other interests change from week to week, but that keeps life interesting. I'm sure he'll grow and change just as much in the next 4 years, but hopefully he will always be these things that I love most about him.
Wednesday, December 5, 2012
review of some helpful hints
There are a few projects from my new holiday pattern popping up on Ravelry. It seems that the baby seal is more popular. These ones by feltalicious7 are very cute. She did make a comment about the head being difficult to shape, so I thought I would offer a couple tips.
First, the most important step to making your knit toy look it's best (after knitting everything correctly) is stuffing it. It takes some patience and practice to get just the right amount of stuffing in each body part, smooth it out, and then add a little extra where it's needed. Even after you sew it closed, you can move stuffing around with a darning needle, and smooth it out with your hands. A toy that's well loved will get squashed over time, but you can replace the stuffing, or adjust the existing stuffing with a darning needle. To use the darning needle, insert it halfway into where you need to adjust the stuffing. Wiggle it around, moving the stuffing to where you need it. You can also insert the needle just under the knit fabric, and wiggle it around to smooth out lumpy stuffing. Practice a bit, it can be fun!
The second tip is that you can also make stitches on the face to pull in the fabric under the eyes and make the nose more prominent. (I will try to make a video tutorial of this, as it's a trick I use on most toys, but it's hard to convey in written instructions). Basically, put about 12" of yarn the colour of the face on a long sharp needle, then insert your needle under the chin, and have it exit just under one eye. Pull the needle through, leaving 3" of yarn where you entered. Make a 1/4" stitch under the eye, then thread your needle back to where you started. Tie together the two strands of yarn - this will pull in the fabric under the eye. When it looks good, make the knot secure. Without cutting your yarn, repeat for the other eye. Then weave in your yarn ends. It may take a couple tries to get the hang of it, but it can really improve the look of the face, especially for toys which need a more prominent muzzle.
First, the most important step to making your knit toy look it's best (after knitting everything correctly) is stuffing it. It takes some patience and practice to get just the right amount of stuffing in each body part, smooth it out, and then add a little extra where it's needed. Even after you sew it closed, you can move stuffing around with a darning needle, and smooth it out with your hands. A toy that's well loved will get squashed over time, but you can replace the stuffing, or adjust the existing stuffing with a darning needle. To use the darning needle, insert it halfway into where you need to adjust the stuffing. Wiggle it around, moving the stuffing to where you need it. You can also insert the needle just under the knit fabric, and wiggle it around to smooth out lumpy stuffing. Practice a bit, it can be fun!
The second tip is that you can also make stitches on the face to pull in the fabric under the eyes and make the nose more prominent. (I will try to make a video tutorial of this, as it's a trick I use on most toys, but it's hard to convey in written instructions). Basically, put about 12" of yarn the colour of the face on a long sharp needle, then insert your needle under the chin, and have it exit just under one eye. Pull the needle through, leaving 3" of yarn where you entered. Make a 1/4" stitch under the eye, then thread your needle back to where you started. Tie together the two strands of yarn - this will pull in the fabric under the eye. When it looks good, make the knot secure. Without cutting your yarn, repeat for the other eye. Then weave in your yarn ends. It may take a couple tries to get the hang of it, but it can really improve the look of the face, especially for toys which need a more prominent muzzle.
Friday, November 23, 2012
inuk and baby seal
First I want to thank everyone who left a suggestion for the holiday pattern. They were all great ideas, and I definitely want to work on some of the others I didn't get to this year (especially the merry wombat! I tried, but it needs more work than I had time for).
In the end, I decided on making the Eskimo, or Inuk, and a baby seal (which was suggested by Mr. Mitten when I couldn't get the merry wombat to turn out right). Below you'll find the instructions for both, with the abbreviations following, if you're unfamiliar with some of the terms. I hope to get the pattern published as a PDF as soon as Mr. Mitten has time to help.

I've tried to design these toys to be simple and fast, so you can make a set in an evening. I've designed them in worsted weight yarn because I always have lots around, but you can easily knit them in a different weight with appropriate sized needles. (Note: changing to finer yarn will make the toys appear slimmer, changing to thicker yarn will make the toys appear plumper). The pattern is advanced beginner to intermediate level, and you will need to know how to knit, purl, increase, decrease, change yarns, make bobbles, work I-cord, and sew seams. However, these all make the toys fun and interesting to knit, and small toys are a great way to learn new skills!
Materials
Inuk: 15 g of worsted weight yarn in main colour (MC), 5 g of worsted weight yarn in light brown, 5 g of worsted weight yarn in black, 5 g of fuzzy or eyelash yarn, pair of 4 mm (US size 6) knitting needles, two 4 mm double pointed needles, pair of 6 mm safety eyes, stuffing, length of ribbon or cord for hanging, tapestry needle
Baby Seal: 15 g of worsted weight yarn in cream, black yarn to embroider face, pair of 4 mm (US size 6) knitting needles, pair of 6 mm safety eyes, stuffing, length of ribbon or cord for hanging, tapestry needle
Gauge: 4.5 sts per 2.5 cm (1 inch) in stockinette
Size: 7.5 cm (3 inches)
Inuk
CO 9 sts with MC.
Row 1: P 1 row.
Row 2: k2, [m1, k1] x 7. (16 sts)
Row 3: P 1 row.
Row 4: k2, [m1, k2] x 7. (23 sts)
Row 5: P 1 row.
Switch to fuzzy yarn on next row.
Row 6: k2, [m1, k3] x 7. (30 sts)
Row 7-9: K 3 rows.
Switch back to MC yarn on next row.
Row 10-11: Beginning with a k row, work 2 rows in st st.
Row 12: k3, [k2tog, k4] x 2, [k4, ssk] x 2, k3. (26 sts)
Row 13: P 1 row.
Row 14: k3, [k2tog, k3] x 2, [k3, ssk] x 2, k3. (22 sts)
Row 15: P 1 row.
Row 16: k6, mb, k8, mb, k6.
Row 17: P 1 row.
On next row, switch to light brown yarn.
Row 18: k5, k2tog, k8, ssk, k5. (20 sts)
Row 19-21: Work 3 rows in st st.
On next row, switch to black yarn.
Row 22-23: Work 2 rows in st st.
Row 24: k1, [k1, k2tog] x 6, k1. (14 sts)
Row 25: P 1 row.
Row 26: k1, [k2tog] 6 times, k1. (8 sts)
Cut yarn leaving a long end, thread end through remaining stitches and pull tight to gather.
Attach safety eyes. Sew back seam down to garter-stitch section. Stuff body. Thread yarn through cast-on stitches, gather, then sew last bit of seam. Weave in yarn ends. You may need to make a couple small stitches around bobble arms to close any holes. Embroider a face and hands. For a girl, add braids for hair. These embellishments can be as simple or as creative as you like.
Hood
Start at front. CO 16 sts with fuzzy yarn.
Row 1-3: Knit 3 rows in garter stitch.
On next row, switch to MC yarn.
Row 4-5: Beginning with a k row, work 2 rows in st st.
Row 6: k5, k2tog, k2, ssk, k5. (14 sts)
Row 7: P 1 row.
Row 8: k4, k2tog, k2, ssk, k4. (12 sts)
Row 9: P 1 row.
Row 10: k3, k2tog, k2, ssk, k3. (10 sts) Bind off, or graft back of hood together. If you bound-off, sew a vertical seam at the back of the hood. Weave in yarn ends. Sew bottom edge of hood to toy, just below the neck. If you are hanging the toy, thread the ribbon or cord through the top of the hood, and tie a knot.
Legs (make 2)
CO 5 sts with MC yarn onto one double pointed needle. Work I-cord for 4 rounds. Bind off. Sew the bound-off edge of legs to bottom of Inuk. Weave in all yarn ends.

Baby Seal
Start at tail. CO 6 sts with cream yarn.
Row 1: P 1 row.
Row 2: k2, [m1, k1] x 4. (10 sts)
Row 3-5: work 3 rows in st st.
Row 6: k2, [m1, k2] x 4. (14 sts)
Row 7: P 1 row.
Row 8: k2, [m1, k2] x 6. (20 sts)
Row 9-13: work 5 rows in st st.
Row 14: k9, m1, k2, m1, k9. (22 sts)
Row 15: P 1 row.
Row 16: k1, k2tog, k7, m1, k2, m1, k7, ssk, k1.
Row 17: P 1 row.
Row 18: [k1, k2tog] x 3, k4, [ssk, k1] x 3. (16 sts)
Row 19-23: work 5 rows in st st.
Row 24: k1, [k2tog] x 3, k2, [ssk] x 3, k1. (10 sts)
Row 25: P 1 row.
Cut yarn leaving a long end, thread end through remaining stitches and pull tight to gather. This is the nose end. Insert safety eyes on head. Sew up seam along underside of body, leaving an opening. Stuff and sew closed. Most of the head shaping is done with the stuffing, adding extra bits to the cheeks and nose. You can also try some soft sculpture for more definition (although baby seals are really cute cute fuzzy blobs!) If you are hanging the toy, thread the ribbon or cord through the back of the neck, and tie a knot.
Flippers (make 4)
CO 8 sts.
Row 1: k6, k2tog. (7 sts)
Row 2: K 1 row.
Row 3: k5, k2tog. (6 sts)
Row 4: K 1 row.
Row 5: k4, k2tog. (5 sts)
Bind off. Fold in half lengthwise and sew together short straight edge.
Sew 2 flippers to tail, with decreased edges facing out, and cast-on edges facing toward the head. Sew other 2 flippers to sides of body near the head, in the same orientation as the tail. Weave in yarn ends.

Abbreviations
[ ] x N = repeat sequence in brackets N times ("to end" means to repeat until the end of the row)
CO = cast on
K or k = knit
k2tog = decrease 1 by knitting 2 together
k3tog = knit 3 together, same technique as k2tog
kfbf = increase 2 by knitting into front, then back, then front of next stitch
m1 = increase 1 by picking up loop between stitch just worked and next stitch, and knit into the back of this loop
mb = make bobble: kfbf, turn, p3, turn, k3, turn, p3, turn, k3tog. You should start and end with 1 st. (there are many ways to make bobbles. If you need help, search for a tutorial that makes sense to you)
P or p = purl
p2tog = decrease 1 by purling 2 stitches together
ssk = decrease 1 by slipping 2 stitches as if to purl, transfer slipped stitches back to left needle, then knit slipped sts together
st or sts = stitch or stitches
st st = stocking stitch
In the end, I decided on making the Eskimo, or Inuk, and a baby seal (which was suggested by Mr. Mitten when I couldn't get the merry wombat to turn out right). Below you'll find the instructions for both, with the abbreviations following, if you're unfamiliar with some of the terms. I hope to get the pattern published as a PDF as soon as Mr. Mitten has time to help.

I've tried to design these toys to be simple and fast, so you can make a set in an evening. I've designed them in worsted weight yarn because I always have lots around, but you can easily knit them in a different weight with appropriate sized needles. (Note: changing to finer yarn will make the toys appear slimmer, changing to thicker yarn will make the toys appear plumper). The pattern is advanced beginner to intermediate level, and you will need to know how to knit, purl, increase, decrease, change yarns, make bobbles, work I-cord, and sew seams. However, these all make the toys fun and interesting to knit, and small toys are a great way to learn new skills!
Materials
Inuk: 15 g of worsted weight yarn in main colour (MC), 5 g of worsted weight yarn in light brown, 5 g of worsted weight yarn in black, 5 g of fuzzy or eyelash yarn, pair of 4 mm (US size 6) knitting needles, two 4 mm double pointed needles, pair of 6 mm safety eyes, stuffing, length of ribbon or cord for hanging, tapestry needle
Baby Seal: 15 g of worsted weight yarn in cream, black yarn to embroider face, pair of 4 mm (US size 6) knitting needles, pair of 6 mm safety eyes, stuffing, length of ribbon or cord for hanging, tapestry needle
Gauge: 4.5 sts per 2.5 cm (1 inch) in stockinette
Size: 7.5 cm (3 inches)
Inuk
CO 9 sts with MC.
Row 1: P 1 row.
Row 2: k2, [m1, k1] x 7. (16 sts)
Row 3: P 1 row.
Row 4: k2, [m1, k2] x 7. (23 sts)
Row 5: P 1 row.
Switch to fuzzy yarn on next row.
Row 6: k2, [m1, k3] x 7. (30 sts)
Row 7-9: K 3 rows.
Switch back to MC yarn on next row.
Row 10-11: Beginning with a k row, work 2 rows in st st.
Row 12: k3, [k2tog, k4] x 2, [k4, ssk] x 2, k3. (26 sts)
Row 13: P 1 row.
Row 14: k3, [k2tog, k3] x 2, [k3, ssk] x 2, k3. (22 sts)
Row 15: P 1 row.
Row 16: k6, mb, k8, mb, k6.
Row 17: P 1 row.
On next row, switch to light brown yarn.
Row 18: k5, k2tog, k8, ssk, k5. (20 sts)
Row 19-21: Work 3 rows in st st.
On next row, switch to black yarn.
Row 22-23: Work 2 rows in st st.
Row 24: k1, [k1, k2tog] x 6, k1. (14 sts)
Row 25: P 1 row.
Row 26: k1, [k2tog] 6 times, k1. (8 sts)
Cut yarn leaving a long end, thread end through remaining stitches and pull tight to gather.
Attach safety eyes. Sew back seam down to garter-stitch section. Stuff body. Thread yarn through cast-on stitches, gather, then sew last bit of seam. Weave in yarn ends. You may need to make a couple small stitches around bobble arms to close any holes. Embroider a face and hands. For a girl, add braids for hair. These embellishments can be as simple or as creative as you like.
Hood
Start at front. CO 16 sts with fuzzy yarn.
Row 1-3: Knit 3 rows in garter stitch.
On next row, switch to MC yarn.
Row 4-5: Beginning with a k row, work 2 rows in st st.
Row 6: k5, k2tog, k2, ssk, k5. (14 sts)
Row 7: P 1 row.
Row 8: k4, k2tog, k2, ssk, k4. (12 sts)
Row 9: P 1 row.
Row 10: k3, k2tog, k2, ssk, k3. (10 sts) Bind off, or graft back of hood together. If you bound-off, sew a vertical seam at the back of the hood. Weave in yarn ends. Sew bottom edge of hood to toy, just below the neck. If you are hanging the toy, thread the ribbon or cord through the top of the hood, and tie a knot.
Legs (make 2)
CO 5 sts with MC yarn onto one double pointed needle. Work I-cord for 4 rounds. Bind off. Sew the bound-off edge of legs to bottom of Inuk. Weave in all yarn ends.

Baby Seal
Start at tail. CO 6 sts with cream yarn.
Row 1: P 1 row.
Row 2: k2, [m1, k1] x 4. (10 sts)
Row 3-5: work 3 rows in st st.
Row 6: k2, [m1, k2] x 4. (14 sts)
Row 7: P 1 row.
Row 8: k2, [m1, k2] x 6. (20 sts)
Row 9-13: work 5 rows in st st.
Row 14: k9, m1, k2, m1, k9. (22 sts)
Row 15: P 1 row.
Row 16: k1, k2tog, k7, m1, k2, m1, k7, ssk, k1.
Row 17: P 1 row.
Row 18: [k1, k2tog] x 3, k4, [ssk, k1] x 3. (16 sts)
Row 19-23: work 5 rows in st st.
Row 24: k1, [k2tog] x 3, k2, [ssk] x 3, k1. (10 sts)
Row 25: P 1 row.
Cut yarn leaving a long end, thread end through remaining stitches and pull tight to gather. This is the nose end. Insert safety eyes on head. Sew up seam along underside of body, leaving an opening. Stuff and sew closed. Most of the head shaping is done with the stuffing, adding extra bits to the cheeks and nose. You can also try some soft sculpture for more definition (although baby seals are really cute cute fuzzy blobs!) If you are hanging the toy, thread the ribbon or cord through the back of the neck, and tie a knot.
Flippers (make 4)
CO 8 sts.
Row 1: k6, k2tog. (7 sts)
Row 2: K 1 row.
Row 3: k5, k2tog. (6 sts)
Row 4: K 1 row.
Row 5: k4, k2tog. (5 sts)
Bind off. Fold in half lengthwise and sew together short straight edge.
Sew 2 flippers to tail, with decreased edges facing out, and cast-on edges facing toward the head. Sew other 2 flippers to sides of body near the head, in the same orientation as the tail. Weave in yarn ends.

Abbreviations
[ ] x N = repeat sequence in brackets N times ("to end" means to repeat until the end of the row)
CO = cast on
K or k = knit
k2tog = decrease 1 by knitting 2 together
k3tog = knit 3 together, same technique as k2tog
kfbf = increase 2 by knitting into front, then back, then front of next stitch
m1 = increase 1 by picking up loop between stitch just worked and next stitch, and knit into the back of this loop
mb = make bobble: kfbf, turn, p3, turn, k3, turn, p3, turn, k3tog. You should start and end with 1 st. (there are many ways to make bobbles. If you need help, search for a tutorial that makes sense to you)
P or p = purl
p2tog = decrease 1 by purling 2 stitches together
ssk = decrease 1 by slipping 2 stitches as if to purl, transfer slipped stitches back to left needle, then knit slipped sts together
st or sts = stitch or stitches
st st = stocking stitch
Thursday, November 22, 2012
holiday mice kits

With no time to spare, I've added a few Holiday Mice kits to my Etsy shop. For $10 US you get all the materials you'll need to make two 3" mice: wool yarn, stuffing, eyes, and embellishments. You'll just need the right size knitting needles and a tapestry needle. A printed copy of the pattern costs $1 extra, since I assume most people will be happy to download it and print it themselves (also saves on shipping). I hope you enjoy making or giving these little gifts!

Kit in grey and blue
Wednesday, November 21, 2012
happy holidays sale
Do you still have time to fit in one or two little holiday knitting projects? Of course you do! Or perhaps you'd like to gift a pattern to someone who likes to knit cute toys? Starting November 22 and running until November 30 (eastern time in Canada), there will be a Happy Holidays Sale in my Ravelry shop!

Use the coupon code "happyholidays" to get 20% off the following holiday patterns:
Baby Penguin
Cozy Elf Tuque
Festive Knits (ebook)
Macaroni Penguin
Polar Bear
Santa Reindeer
Surfer Koala (for my friends in the Southern hemisphere)
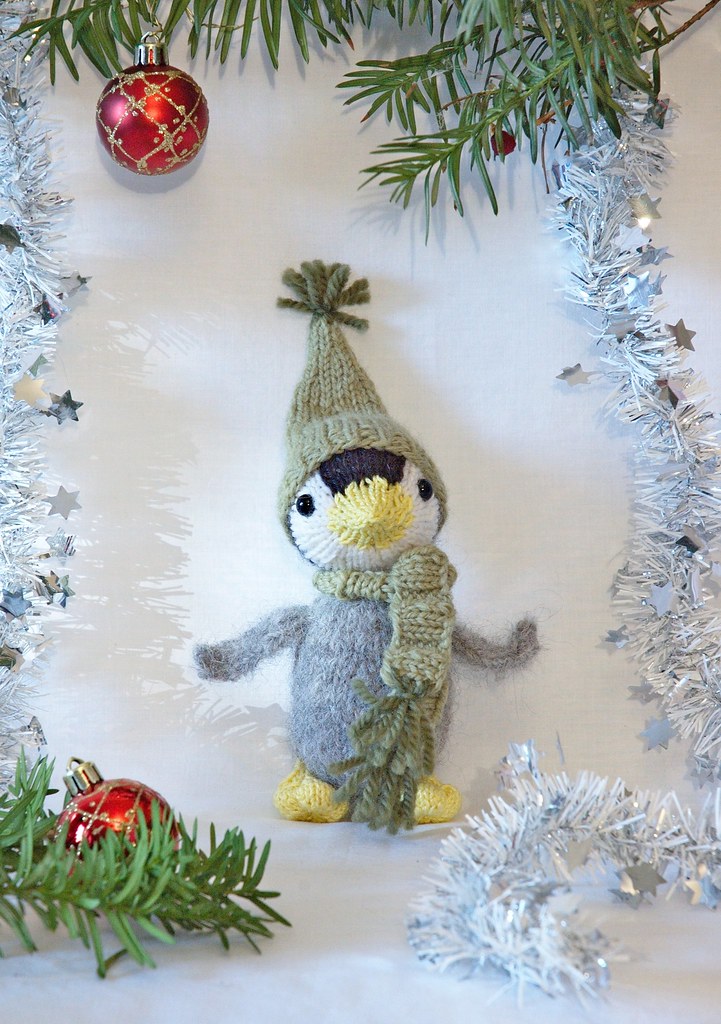
But even if you decide not to use the coupon, I have a new holiday pattern for you which should be ready very soon!
Use the coupon code "happyholidays" to get 20% off the following holiday patterns:
Baby Penguin
Cozy Elf Tuque
Festive Knits (ebook)
Macaroni Penguin
Polar Bear
Santa Reindeer
Surfer Koala (for my friends in the Southern hemisphere)
But even if you decide not to use the coupon, I have a new holiday pattern for you which should be ready very soon!
Tuesday, November 6, 2012
ideas, anyone?
In the past I've published a few free patterns for holiday decorations, mostly because they're quick, fun projects that are even better when shared. The most popular by far was the Holiday Mice pattern, and I haven't even tried to top that one since it was published. However, I'm feeling like I want to do something this year, but I'm a bit short of inspiration.
I had a quick browse through Ravelry, and goodness! If you wanted to knit a stocking or tiny pullover, you could keep your needles busy for the rest of your life and not run out of patterns. There are also a number of very cute snowmen, birds, gingerbread men, Santa/elves, trees, and acorns. So what does that leave? I have no idea, which is why I thought I might ask what you would like to knit this year.
I can't promise to design anything that is suggested, and I certainly can't promise to design all of them! (Just wanted to write that, as there's been confusion in the past) But if you have a great idea that you think I could make something out of, please leave a comment! Perhaps if we all put our heads together, I can come up with a great design for you.
I had a quick browse through Ravelry, and goodness! If you wanted to knit a stocking or tiny pullover, you could keep your needles busy for the rest of your life and not run out of patterns. There are also a number of very cute snowmen, birds, gingerbread men, Santa/elves, trees, and acorns. So what does that leave? I have no idea, which is why I thought I might ask what you would like to knit this year.
I can't promise to design anything that is suggested, and I certainly can't promise to design all of them! (Just wanted to write that, as there's been confusion in the past) But if you have a great idea that you think I could make something out of, please leave a comment! Perhaps if we all put our heads together, I can come up with a great design for you.
Subscribe to:
Posts (Atom)