Friday, November 28, 2008

time to decorate!


I've been so busy thinking about baby things lately, I've barely given a thought to that big holiday coming up soon! Yesterday I had a brief idea of offering you something special today, but couldn't come up with anything on such short notice. At least there is my contest next week to look forward to! I've been putting off the decorating until December 1st too, trying to keep myself from getting overwhelmed too soon. We might even get our own little tree this year! Although, I suspect my cats will think it's a treat for them (they've tried to eat every plant I've had in the house).

I don't even know what I'm sending my family for gifts, and I believe I'll have to pump my mom for some ideas of what they'd like (for many reasons we're staying out here for the holidays, rather than seeing my family in BC). I've knit up some of the felted stars, and have plans to make more (I have a big family). But many of the special things about where I live would be a little tricky to send: maple syrup and local alcoholic brews being two good examples. Most years I manage to think of something just right for each member of my family, but maybe this year they will have to be content with a new grandson/nephew to spoil!

Tuesday, November 25, 2008

festive knits kits


This is just a quick note to let you know I listed three Festive Knits kits in my Etsy shop. I wanted to make more, but sewing has become a little difficult with such a big belly to get in the way! There's a kit to make an Owl and Baby, a Fuzzy Farm set, and a Baby Penguin. Each is a little special and different.

It seems people like the Felted Stars pattern I posted! I can't believe how many copies have been downloaded from Ravelry already (you can find it through the Ravelry Shop link there on the right). I wish I could have taken better photos of them, since they are super cute and fuzzy (just like the other things I knit!). But, I didn't want to put up holiday decorations yet, and we just had our first snow today. Which, by the way, is nasty and wet and not at all nice to be out in. Anyway, this left few options for cute holiday photos. I've knit bunches of the stars myself, since they will most likely be gifts for my family this year, and there's something addictive about their simplicity, pretty colours, and playing in a sink of hot water when it's cold out.

Monday, November 24, 2008

felted stars

Here's a new free pattern for you! I came up with this idea in the middle of the night (no kidding, but I did wait until morning to start on it) and after a few false starts, I hit on a simple and fast method of knitting them. They also need very little yarn, so I've been using up odd ends of hand-dyed yarn to make them. The felting makes them flat, and look lovely and soft from both sides. Make sure you use 100% wool yarn or they will not felt properly. You could try knitting them with a different weight yarn (with appropriate sized needles) to achieve larger or smaller stars. I think they will look lovely on a tree, added to a garland, or just hung up wherever you like!
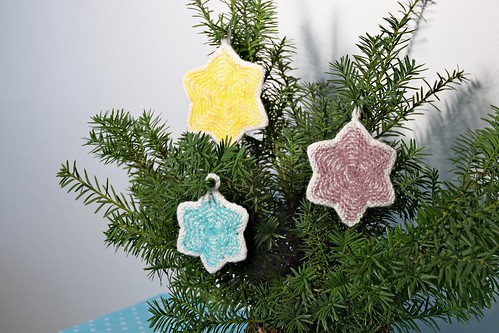

Felted Stars

Materials
Tools: set of four 4mm dpns, tapestry needle, crochet hook (optional)
Large: 14 m or yards (about 7 g) of worsted weight wool in colour A, same amount of worsted weight wool in colour B
Medium: 10 m or yards (about 5 g) of worsted weight wool in colour A, same amount of worsted weight wool in colour B
Small: 8 m or yards (about 4 g) of worsted weight wool in colour A, same amount of worsted weight wool in colour B

Measurements
Large: 12 cm (4.75") diameter
Medium: 10 cm (4") diameter
Small: 8 cm (3.25") diameter
(note: finished size of star will depend on amount of felting and blocking you do)

Large Star

Cast on 72 sts with yarn A. Distribute 24 sts to each of 3 needles. P 1 round.
Work round 2 with yarn B. For rest of star, purl odd number rows with yarn A, and work even number rows in yarn B.
Rnd 2: [k2tog, k4, yo, k4, skpo] 6 times. (66 sts)
Rnd 4: [k2tog, k3, yo, k4, skpo] 6 times. (60 sts)
Rnd 6: [k2tog, k3, yo, k3, skpo] 6 times. (54 sts)
Rnd 8: [k2tog, k2, yo, k3, skpo] 6 times. (48 sts)
Rnd 10: [k2tog, k2, yo, k2, skpo] 6 times. (42 sts)
Rnd 12: [k2tog, k1, yo, k2, skpo] 6 times. (36 sts)
Rnd 14: [k2tog, k1, yo, k1, skpo] 6 times. (30 sts)
Rnd 16: [k2tog, yo, k1, skpo] 6 times. (24 sts)
Rnd 18: [k2tog, yo, skpo] 6 times. (18 sts)
Rnd 20: [k2tog] 9 times. (9 sts)
Break off yarn B, thread end through remaining sts, and pull tight to gather.

Medium Star

Cast on 60 sts with yarn A. Distribute 20 sts to each of 3 needles. P 1 round.
Follow pattern for large star starting at Rnd 6, working even numbered rounds in yarn B.

Small Star

Cast on 48 sts with A. Distribute 16 sts to each of 3 needles. P 1 round.
Follow pattern for large star starting at Rnd 10, working even numbered rounds in yarn B.

Finishing
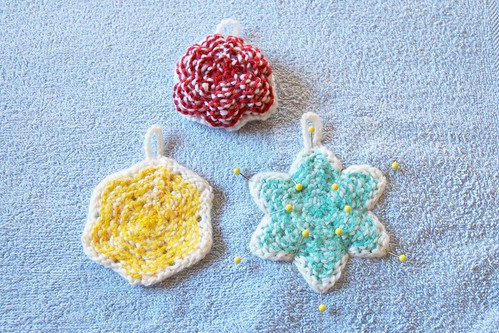
Weave in all yarn ends securely. Optional: crochet a loop on one of the star points. Hand-felt the star in hot water until it is flat and smooth (stars will be cup-shaped before felting). Gently remove as much water as possible, then pin to a flat surface, stretching out points and indenting between points. Leave until dry. If you didn't crochet a loop for hanging, you can add a length of yarn or ribbon.


Abbreviations
k = knit
k2tog = knit 2 sts together
p = purl
skpo = slip 1, knit 1, pass slipped stitch over knit stitch
yo = yarn over

Friday, November 21, 2008

awww

In case you're hesitating over participating in my hubbie's contest, I say go for it! He's really excited to draw the portrait, and we're both excited to read your stories. They don't have to be long or perfectly written, just tell us about how great or funny your kid was this one time... I think all moms are pretty good at that, right?

As for my contest, I've decided to give away a copy of Festive Knits! A shiny new printed copy to whomever wins. However, if the winner has already bought it (and lots have, thank you so much!) I will put together a package of goodies for you, probably involving some combination of yarn, fabric, buttons, and chocolate.

And to round off the week properly, here is an absolutely adorable bunny made by Kelli. I spotted this little treasure on Ravelry a few days ago, and she made even my husband say, "awww."

Thursday, November 20, 2008

Mr. Mitten's holiday give-away!


Pensive, originally uploaded by mricon.

Hi, everyone -- Mr. Mitten here again. Usually it's Barbara who announces the giveaways, but I figured I shouldn't let her have all the fun. :)

I'm going to be giving away one custom-made portrait! I'm not a professionally trained artist, but I do enjoy putting pencil to paper every now and again.

Since we're getting ready to welcome our first child into the big wide world, I think that "kids" would be a good theme for the giveaway. If you would like to enter the contest, send a short funny story about your child and a portrait picture you would like done to konstantin@fuzzymitten.com. Drawing from photos can be a little tricky, so it's best if the picture is a studio portrait, or even just a high quality digital shot with good lighting. The deadline for submissions will be December 1st -- and I'll try to get the portrait done by December 10th so I can mail it in time.

I guarantee to be completely arbitrary in my selection of the winner, though I'm sure Barbara will have a say. :)

Cheers,
-Konstantin

Tuesday, November 18, 2008

give-away day

One of the blogs I read regularly is Sew-Mama-Sew. Even with so little time to sew things for myself, it's always fun to see what interesting ideas they've dug up, and they often post links to useful tutorials. They've decided to have a Give-Away Day on December 3, where they will list any blogs that want to host a give-away contest on that day. The items are all supposed to be hand-made themselves, or materials for making things. By visiting their site for the list of participating blogs, you can easily participate in a whole bunch of contests, and so increase your chance of winning a little gift for the holidays!

Since I haven't hosted a give-away in months, I think it's a great idea to join in! I have no idea yet what I might have as the prize, or if I will make it a contest or a draw. Whatever I decide, make sure to check in on that day for your chance to win! (don't worry, I will mention it again before that date for all of us forgetful people :)

Monday, November 17, 2008

busy weekend

I hope you all had an excellent weekend! I had a busy one. Saturday we went to town and spent lots of money - babies require so many things! Good thing we've been saving up for a while. Just one quick trip to Ikea, and our spare room will be all ready for our little boy. I've had to give up my sewing room, but we had empty space in our living room for the sewing table, and I don't mind, given the reason! Yesterday I spent the whole afternoon making curtains for his room. I wanted to do them well, with lining because of the street-light outside the window. I didn't expect all that fabric to be such a big job to haul around, from pinning on the floor, to sewing machine, to lap for the final hem. It's all done now, though, and looks great!

I also found time to work on something new for the holidays! A free pattern for little decorations, a bit like I did last year. I need to knit a few more to double check everything, and take photos, but it should be all ready by this time next week!

Friday, November 14, 2008

hint #9


I've been asked many times how I shape the heads of my toys so they don't just look like round blobs. While proper stuffing helps a lot, I have a little trick that helps the face keep it's shape.

Here you can see a very basic diagram I've drawn. It shows the toy head from the front, so you see both eyes and the nose. The blue line shows the seam. I have drawn the diagram as if you were using safety eyes, so they are already attached.

The purple lines show where to make the stitches to shape the head. You'll need a tapestry or soft-sculpture needle with about 12" of yarn the same colour as the face. Insert your needle with yarn at the bottom of the head, have it come up just under one eye, and make a short stitch towards the centre of the face. Have the needle and yarn exit the head near when you started. Then snug up the yarn to shape the face, and knot the yarn securely. Repeat this for the other eye.

If you are using buttons for eyes, the process is the same, except you are making the stitches through the buttons, and you'll want to use heavy thread instead of yarn. Passing the thread through the button 3 times is usually enough to hold it on securely. This process also allows you to hide the yarn or thread ends when you sew the head to the body.

I hope this was helpful! I am thinking of making a video of the process for my blog, but I'm not sure when I will have time to do that.

Thursday, November 13, 2008

slipper pattern

I promised a few weeks ago to share this pattern, and finally had a bit of time to find it and fix it up for you! These slippers are knit flat and seamed up the back*, and shaped to fit the toys with rounded feet (not the toys with big feet like the bunnies and monkeys). I don't remember how much yarn I used to knit these, but it wasn't very much.


Slippers (make 2)

Materials: small amount of fingering or sock weight yarn, 3 mm (US size 2.5) needles, tapestry needle

Cast on 14 sts.
Row 1: P 1 row.
Row 2: k1, [m1, k1] across. (27 sts)
Row 3: P 1 row.
Row 4: k2, [m1, k4] x 6, m1, k1. (34 sts)
Row 5-9: work 5 rows in st st.
Row 10: k11, [skpo] 3 times, [k2tog] 3 times, k11. (28 sts)
Row 11: P 1 row.
Row 12: k8, [skpo] 3 times, [k2tog] 3 times, k8. (22 sts)
Row 13-15: work 3 rows in st st.
Row 16-18: work 3 rows in [k1, p1] rib.
Row 19: bind off loosely in pattern (tip: use a larger needle).
Sew together back seam and sole of sock.

The slippers will be a bit snug to get on, but this way they don't fall off!

*You should be able to convert this pattern to knit in the round, using dpns. Just remember to knit the rows that are written as "P 1 row"

Tuesday, November 11, 2008

Book pricing and costs

Hi, everyone. Mr. Mitten here with some more info on the book's pricing. As Barbara said earlier today, Lulu recently had a price hike on all printed materials. Before, you were paying $12 in printing costs per book, but now it's up to $15, which is quite a significant difference. Unfortunately, that means that we couldn't continue charging $19.95 per book, especially considering that we also have to pay Lulu's commission on each item sold.

This is why the price for printed books went up by a bit. We tried to make it up to you guys by lowering the price on the download version to $17.50 -- hopefully this will help those of you who aren't interested in getting the printed version (though it's nice and shiny! I'm very pleased with it.)

Just a couple of words about our operating costs -- we barely have any. :) The book was written entirely in Free Software (pictures done in Gimp, covers and charts done in Inkscape, and the layout done in Scribus, all of it running on Fedora Linux). Apart from Lulu (or Etsy), there are no other middlemen, so anything you pay goes straight to the artist, making sure that she is always pregnant with new ideas (*badum-pum!* ;)).

Overall, this distribution model works out pretty well for everyone, and unless Lulu's printing costs go up again, we should be able to continue to offer patterns at comparatively low costs (at least compared to some other pattern designers.)

the new book is here!


Hooray! Huzzah! The new Festive Knits book is here! My wonderful sweetie even stayed up late last night, getting everything ready for you. So now you can get your own copy of the book, either printed or as a download! I'm super excited about this new pattern book, and I hope you all love the patterns too. Oh, and when you go check out those listings, the preview will take a little time to load so have patience! Our printed copy is gorgeous, and the new size is so practical, and still easy to read.

I must mention a couple of things now. First, the price of the printed books has gone up a bit. I hate to do this, as I know times are hard for lots of us, but Lulu has nearly doubled their printing costs and I need to make a little on each copy. However, the download versions of the books are still the lower price. Second, the download version of the book comes in the 6"x9" size, but as long as you have a newer printer it should scale it automatically when you print. You really shouldn't have to do anything special to get it to come out full-size on whatever paper you have (letter or a4). If your printer is a bit older and does decide to have fits over printing, please email me and I'll do my best to sort you out.

We also got the Owl and Baby pattern all ready for you, and I'll list that as soon as I get time today. It's such a super sweet and adorable pattern, and I love that the owls look great no matter what colour you knit them in - brown, turquoise, or even green! The baby owl takes hardly any yarn at all, and is such a great way to use up a little bit of fuzzy yarn from some other project.

Happy knitting, everyone!

Sunday, November 9, 2008

gingerbread cupcakes

Yesterday was my baby shower, and I had a few friends over. Instead of playing embarrassing games, we baked cupcakes. However, the mothers there did tell stories about their pregnancies, frightening at least one person into swearing she didn't want children (and we didn't even get into the really unpleasant parts!) I made mini gingerbread cupcakes with lemon glaze, and promised to share the recipe, since they turned out so well. Hopefully this makes up for the emotional scarring of my friend :)


Gingerbread Cupcakes

Makes 4 dozen mini
cupcakes, 1 dozen regular size cupcakes, or a 9" square cake.

2 1/4 cups all-purpose flour

1 1/2 tsp baking soda

2 tsp ground ginger

1 tsp ground cinnamon

1 tsp ground allspice
1/4 tsp ground black pepper

Mix together well in one bowl.


1 cup hot water

3/4 cup molasses

1/4 cup honey


In a second bowl, add hot water to molasses and honey, and stir until they are dissolved.


1/2 cup butter

1 large egg

1/2 cup white sugar


Cream butter in a third large bowl. Add sugar and mix well. Add egg and mix until smooth.


Add half of dry ingredients to butter mixture, and mix well, then add half of liquid ingredients and mix until smooth. Repeat with rest of dry and wet ingredients.

Prepare pans with paper liners, or grease and flour cake pan. Pour batter into pans. Bake at 350 F: 10-12 minutes for mini cupcakes, 15 minutes for regular cupcakes, or 1 hour for cake. Place on cooling rack until cool.

Lemon Glaze


1 1/2 cups icing sugar

6-8 tsp lemon juice


In a small bowl, stir lemon juice into icing sugar one tsp at a time until you have a thick but spreadable glaze (you may not need all the lemon juice).
Spread over top of cool cupcakes - glaze will smooth out after spreading, and be sure to add any decorations right away as the glaze surface will dry after a few minutes.

Friday, November 7, 2008

cranberry chutney

I promised to post this recipe a while ago, and had been waiting to get a photo to go with it. But you know, it just looks like a jar of dark-red stuff, which wouldn't really be helpful! This was delicious with the turkey and the wild boar we had at two different Thanksgiving suppers. I think it would be good with any poultry or game meat, and possibly even salmon. Regular cranberry sauce is good, but this is much more flavourful, with a tangy and spicy edge.

If you have not done any preserving before, please read up on the right techniques. I've only given basic directions below, and I would hate for your preserves to go bad because you weren't sure what some of the directions meant. However, if you're really worried about the processing, you can just freeze it.

Cranberry Chutney

Makes about 6 half-pint (250 ml) jars

1 package fresh cranberries (12 oz or 340 g)
1 cup drained crushed pineapple (250 ml)
2 tbsp grated fresh ginger (30 ml)
zest of 1 orange (about 1 tsp or 5 ml)
juice of 1 orange (about 1/4 cup or 60 ml)
1 cup red wine vinegar (250 ml)
1 1/2 cups white sugar (375 ml)
1 cup raisins (250 ml)
juice from pineapple, plus enough water to make 1 cup (250 ml)
1 tsp ground cinnamon (5 ml)
1 tsp ground cloves (5 ml)

In a large pot, combine the cranberries, pineapple, ginger, orange zest and juice, and vinegar. Bring to a boil, then turn down temperature and simmer for 15 minutes. Add the rest of the ingredients, and simmer for another 15 minutes or until the chutney is thickened.

Wash and sterilize the jars while the chutney is cooking.

Ladle the chutney into the hot jars, leaving 1/2 inch (1.5 cm) headspace. Clean jar top before screwing on lids.

Place jars in canner, cover with water, and process for 10 minutes.

Thursday, November 6, 2008

swift advice

It's been a busy week, and we're still waiting for our first copy of Festive Knits, so there hasn't been much worth writing about. However, I've been thinking about investing a little into some equipment for my business - specifically a swift and ball winder. Honestly, I would mostly use it for work! Besides, I don't buy that much yarn for myself. I just like the idea of making standard sized skeins for dying, and being able to wind up lovely cakes of yarn for the kits. So I was wondering if you have any advice on what I should look for, and what I should avoid. I'm not even sure how much choice there is in this type of equipment. But I would like to avoid buying something crappy that will break after 5 uses, and maybe other readers will be interested in your experiences too.