
It's been a little quiet around here lately, hasn't it? Not because I have nothing to say, but it's been so difficult to find time to think, then take photos, and finally write it all up so it makes sense. I'm sure we all have times in our lives like that. The last few weeks this is because it's the start of cold and flu season, and Lev seems to be catching anything that comes his way. Poor munchkin barely has a day between getting better and the next set of germs. I'm so glad I'm generally quite healthy, so I don't have to try taking care of a sick baby while I'm sick too!
I have found a little knitting time, and I'm slowly making progress on the last few toys for Fuzzy Knits. The Polar Bear, Monkey, and Pupster are all finished. The Tiger is made up, but I'm still thinking about changing her dress, so she's been stalled for a couple of weeks. That just leaves the Easter Bunny, and I don't plan to make any major changes to him (just a longer jacket), so he should get done more quickly. I really want to get photos, so you can see what they look like! The Pupster is much cuter with ears and a body :)
Anyway, hopefully I can convince Mr. Mitten to find the time to work on the book, so you don't have to wait too much longer. At the very latest, it will be done in time for holiday ordering. This book will also be available on Qoop, so you can take advantage of their lower prices on printed books.
I think I hear waking noises from Lev's room, so I must go. Have a lovely weekend, all!
Friday, October 23, 2009
Friday, October 16, 2009
Nose and Mouth Tutorial
At long last, a tutorial for embroidering the nose and mouth! I'm going to be brief, since I'm trying to get this done while Baby Mitten naps. The photos aren't great, because I was trying to chase the sun around my dining table, while holding the camera in my right hand, and the toy in my left. Anyway, I may add more details to the descriptions later if they're not clear enough.
Step 1: Head knit, stuffed, sewn closed, and eyes attached. I've also done a little shaping as described in this blog post. The columns of knit stitches make a good guide to follow for the shape of the nose, as they make a v-shape as they're gathered in at the nose point.
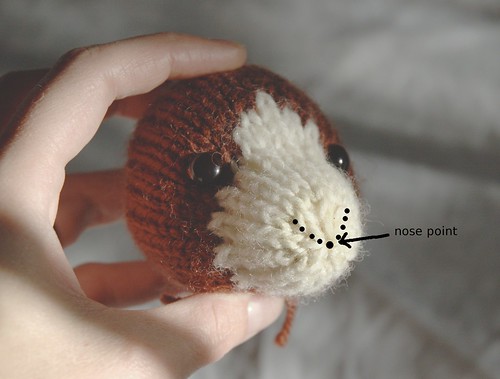
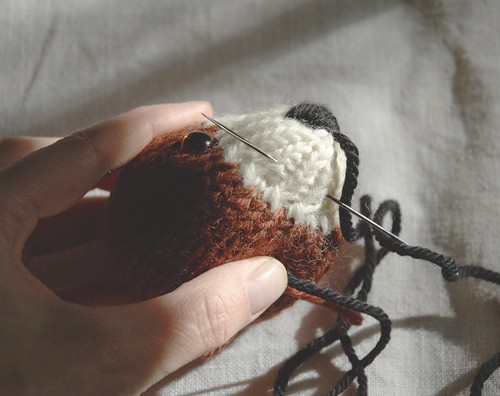
Step 2: Insert the needle with yarn from the bottom centre of the head, and have it emerge about a third of the distance between the nose point and the eye. (A long sharp needle with a large eye makes the embroidering much easier). Pull yarn through, leaving a short tail on the bottom of the head.

Step 3: Insert the needle on the opposite side of the head, trying to get it as symmetrical as possible (this often takes a few tries) and have the needle emerge back on the first side, just below where you started. Pull yarn through, but not too tight or the nose will pucker.
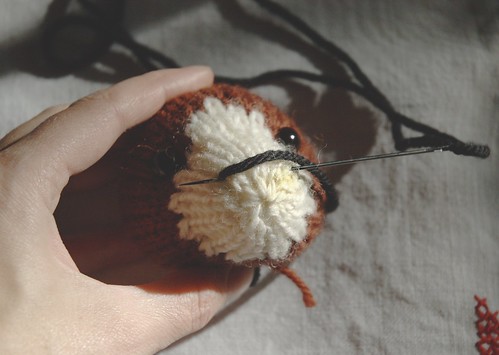
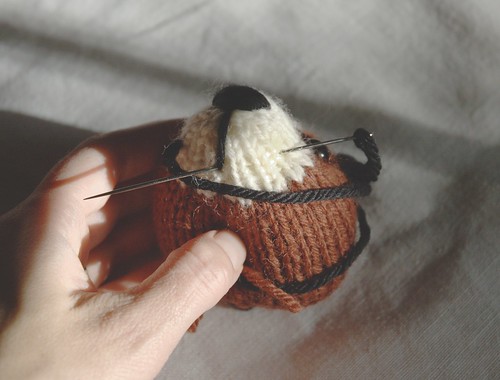
Step 4: Continue as in Step 3, following the lines of knit stitches towards the nose point. Each stitch should be slightly shorter than the one above.
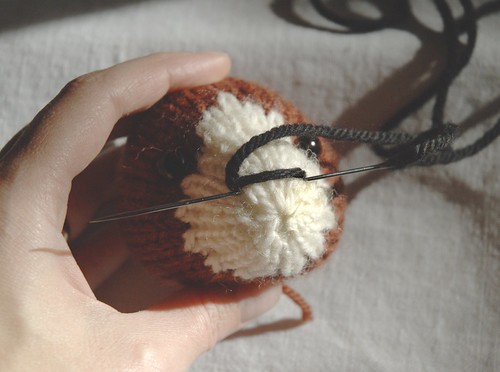
Step 5: Nearly there. If you find you haven't placed your stitches close enough and the nose is patchy, add extra stitches to fill in, or pull out what you've done and go back to do it better.*
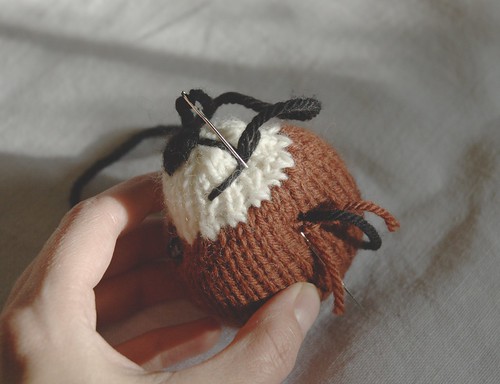
Step 6: One you've reached the nose point, which should be where you finish with the shortest stitch, have the needle emerge right in the centre of the nose point. Insert the needle directly below the nose to make a vertical stitch (however long you like). Then, have the needle emerge to the side of the muzzle (again, the size of the smile depends on your preference). Pull yarn through.
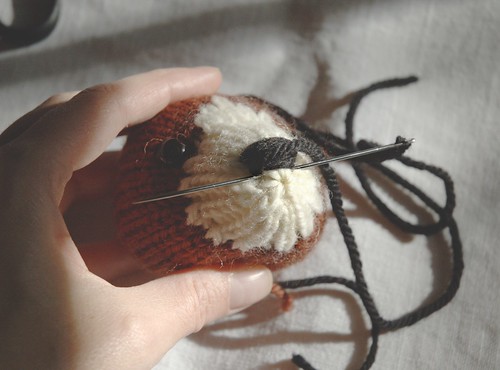
Step 7: Insert the needle on the opposite side of the muzzle, checking from the front for symmetry, and have it emerge at the bottom end of your vertical stitch. Pull yarn through, but not too tightly.
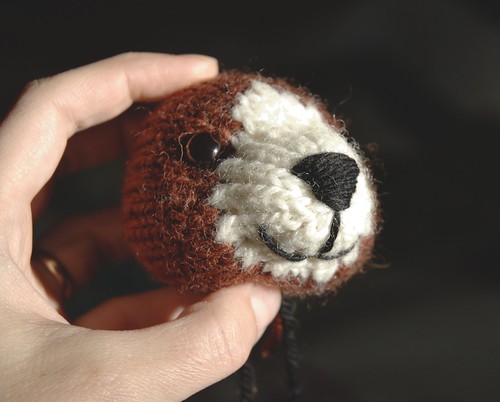
Step 8: Finally, insert the needle into the same place you just came out from, catching the horizontal stitch of the mouth by making a loop over top of it. Your needle should come out at the bottom of the head, where you started this business. Pull yarn through and snug up the loop holding down the smile.
Step 9: Knot yarn ends securely and cut off about 2.5 cm (1") long. Admire handiwork before getting on with the rest of the toy.
If you need a closer look at any of the images, just click on the photo and it will take you to the Flickr page where you can look at a larger size.
* Honestly, in spite of the large number of toys I've made, I often have to rip out the face and do it over. This is usually the result of impatience or lack of attention, so don't despair that a little practice will make it easy-peasy for you :)
Step 1: Head knit, stuffed, sewn closed, and eyes attached. I've also done a little shaping as described in this blog post. The columns of knit stitches make a good guide to follow for the shape of the nose, as they make a v-shape as they're gathered in at the nose point.
Step 2: Insert the needle with yarn from the bottom centre of the head, and have it emerge about a third of the distance between the nose point and the eye. (A long sharp needle with a large eye makes the embroidering much easier). Pull yarn through, leaving a short tail on the bottom of the head.
Step 3: Insert the needle on the opposite side of the head, trying to get it as symmetrical as possible (this often takes a few tries) and have the needle emerge back on the first side, just below where you started. Pull yarn through, but not too tight or the nose will pucker.
Step 4: Continue as in Step 3, following the lines of knit stitches towards the nose point. Each stitch should be slightly shorter than the one above.
Step 5: Nearly there. If you find you haven't placed your stitches close enough and the nose is patchy, add extra stitches to fill in, or pull out what you've done and go back to do it better.*
Step 6: One you've reached the nose point, which should be where you finish with the shortest stitch, have the needle emerge right in the centre of the nose point. Insert the needle directly below the nose to make a vertical stitch (however long you like). Then, have the needle emerge to the side of the muzzle (again, the size of the smile depends on your preference). Pull yarn through.
Step 7: Insert the needle on the opposite side of the muzzle, checking from the front for symmetry, and have it emerge at the bottom end of your vertical stitch. Pull yarn through, but not too tightly.
Step 8: Finally, insert the needle into the same place you just came out from, catching the horizontal stitch of the mouth by making a loop over top of it. Your needle should come out at the bottom of the head, where you started this business. Pull yarn through and snug up the loop holding down the smile.
Step 9: Knot yarn ends securely and cut off about 2.5 cm (1") long. Admire handiwork before getting on with the rest of the toy.
If you need a closer look at any of the images, just click on the photo and it will take you to the Flickr page where you can look at a larger size.
* Honestly, in spite of the large number of toys I've made, I often have to rip out the face and do it over. This is usually the result of impatience or lack of attention, so don't despair that a little practice will make it easy-peasy for you :)
Friday, October 9, 2009
monster time!
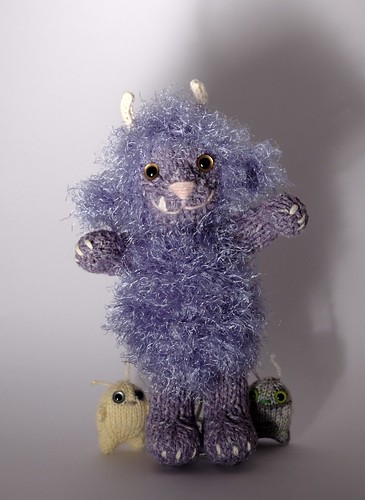
I decided to abandon the Halloween outfit idea, because my enthusiasm for it was waning only half-way through the first try. I was far too in love with the monster I had been knitting, so I finished that instead. I don't have the time to publish it as a new pattern (besides, I've put out a lot of new ones lately), so I'm going to give you some basic directions on how to make your own Fuzzy Monster! This is a project that can only be improved by applying your own creativity, so read what I did, then go wild!
First, download the Fuzzy Lamb pattern if you don't already have it (Ravelry, or direct).
Next, materials:
25 g of eyelash or fuzzy yarn, 25 g of coordinating smooth yarn (I used Bernat Eyelash yarn, and some cotton yarn), a small amount of yarn for the nose, some white yarn for horns and claws, a small amount of white felt, 4 mm (US size 6) knitting needles, two 4 mm dpns or a crochet hook, two safety eyes or buttons, stuffing, a darning needle, hand sewing needle and white thread
Work the arms and legs in the smooth yarn. You can vary the length by adding or subtracting rows after row 14. Work the body and ears in the fuzzy yarn. For the head, use the fuzzy yarn for the main colour, and the smooth yarn for the contrasting colour.
Once the head is done (eyes on, nose & mouth embroidered), cut teeth from the white felt and sew onto the face (or embroider them if you don't have felt). Assemble the rest of the toy. Embroider claws on hands and feet.
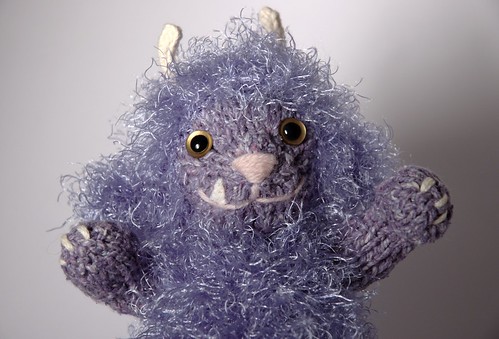
For the horns, on the dpns knit 2 short lengths of 4 stitch I-cord with the white yarn. I made mine 7 rows long before casting off. Sew the cast-off edge of the horns to the head, and secure the yarn ends. If you don't know how to knit I-cord, try crocheting some horns.
Finally, head your monster in the direction of the nearest small village which requires terrorizing!
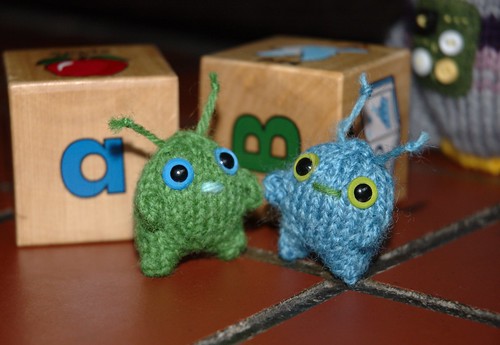
P.S. If you're short on knitting time, just whip up some mini aliens to pop into the treat bags of special little ones.
First, download the Fuzzy Lamb pattern if you don't already have it (Ravelry, or direct).
Next, materials:
25 g of eyelash or fuzzy yarn, 25 g of coordinating smooth yarn (I used Bernat Eyelash yarn, and some cotton yarn), a small amount of yarn for the nose, some white yarn for horns and claws, a small amount of white felt, 4 mm (US size 6) knitting needles, two 4 mm dpns or a crochet hook, two safety eyes or buttons, stuffing, a darning needle, hand sewing needle and white thread
Work the arms and legs in the smooth yarn. You can vary the length by adding or subtracting rows after row 14. Work the body and ears in the fuzzy yarn. For the head, use the fuzzy yarn for the main colour, and the smooth yarn for the contrasting colour.
Once the head is done (eyes on, nose & mouth embroidered), cut teeth from the white felt and sew onto the face (or embroider them if you don't have felt). Assemble the rest of the toy. Embroider claws on hands and feet.
For the horns, on the dpns knit 2 short lengths of 4 stitch I-cord with the white yarn. I made mine 7 rows long before casting off. Sew the cast-off edge of the horns to the head, and secure the yarn ends. If you don't know how to knit I-cord, try crocheting some horns.
Finally, head your monster in the direction of the nearest small village which requires terrorizing!
P.S. If you're short on knitting time, just whip up some mini aliens to pop into the treat bags of special little ones.
Wednesday, October 7, 2009
Mini alien en français
Pour toutes et tous parmi vous qui sont francophones, la version française de "Mini Alien" est maintenant disponible sur le blogue de Knit Spirit. Merci beaucoup pour la traduction, c'est très gentil. :) En effet, son blogue est plein de tout sorte d'excellent contenu sur le sujet de tricotage qui est certain d'attirer votre attention -- ne le passez pas à côté!
J'aimerais bien que mon français était assez bon pour faire tous nos patrons disponibles en français aussi qu'en anglais, mais hélas -- c'est un peu trop pour ce pauvre russe anglophone au Québec. :)
Salut,
-K
J'aimerais bien que mon français était assez bon pour faire tous nos patrons disponibles en français aussi qu'en anglais, mais hélas -- c'est un peu trop pour ce pauvre russe anglophone au Québec. :)
Salut,
-K
Monday, October 5, 2009
shorter days, less time
Wow! I had no idea the Owl Tuque would be so popular. I can't wait to write that nice cheque for the Ecomuseum. I hope to see more of your projects soon. It should be interesting to see what yarns you use, and how they turn out. This might be a good project for odd skeins of hand-spun too.
I wish I had more interesting news and photos to share with you. I've been doing a lot of Autumn-related stuff: transplanting perennials and doing a bit of garden clean-up, putting up batches of different preserves, going for long walks on the rare nice days, suffering through our first colds of the season, and trying to work up some fun Halloween toy ideas for you. Unfortunately for that last one, my knitting time has been pretty scarce the last several weeks.
One project I had going was a cute and furry monster made from the Fuzzy Lamb pattern. I really don't see how I will find time to finish it, though. The basic idea was to use crazy/colourful eyelash or other furry yarn for the main colour, and a smooth coordinating yarn for the contrasting colour. Then I was going to add little I-cord horns, and maybe some pointy felt teeth. *sigh* It would have been so awesome. Feel free to use any of these ideas and let me know, so I can share your finished monsters here!
The other Halloween idea I had was a costume, but the yarn for it only arrived today. If I use my evening knitting time (usually reserved for socks) I should be able to get it done by this weekend. If I don't get it done in time for the holiday, I'll share it anyway because I'm pretty sure some of you will like it.
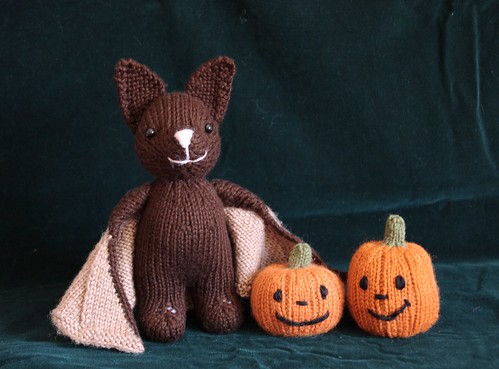
Even if I don't get any new toys out there for Halloween, you could always try my Bat pattern. He's pretty cute, if I say so myself :)
P.S. The messaging system on Lulu is broken, and I haven't been able to check my messages there for at least a couple weeks. If you need to contact me, please use my email (barbara at fuzzymitten dot com)
I wish I had more interesting news and photos to share with you. I've been doing a lot of Autumn-related stuff: transplanting perennials and doing a bit of garden clean-up, putting up batches of different preserves, going for long walks on the rare nice days, suffering through our first colds of the season, and trying to work up some fun Halloween toy ideas for you. Unfortunately for that last one, my knitting time has been pretty scarce the last several weeks.
One project I had going was a cute and furry monster made from the Fuzzy Lamb pattern. I really don't see how I will find time to finish it, though. The basic idea was to use crazy/colourful eyelash or other furry yarn for the main colour, and a smooth coordinating yarn for the contrasting colour. Then I was going to add little I-cord horns, and maybe some pointy felt teeth. *sigh* It would have been so awesome. Feel free to use any of these ideas and let me know, so I can share your finished monsters here!
The other Halloween idea I had was a costume, but the yarn for it only arrived today. If I use my evening knitting time (usually reserved for socks) I should be able to get it done by this weekend. If I don't get it done in time for the holiday, I'll share it anyway because I'm pretty sure some of you will like it.
Even if I don't get any new toys out there for Halloween, you could always try my Bat pattern. He's pretty cute, if I say so myself :)
P.S. The messaging system on Lulu is broken, and I haven't been able to check my messages there for at least a couple weeks. If you need to contact me, please use my email (barbara at fuzzymitten dot com)
Subscribe to:
Posts (Atom)