
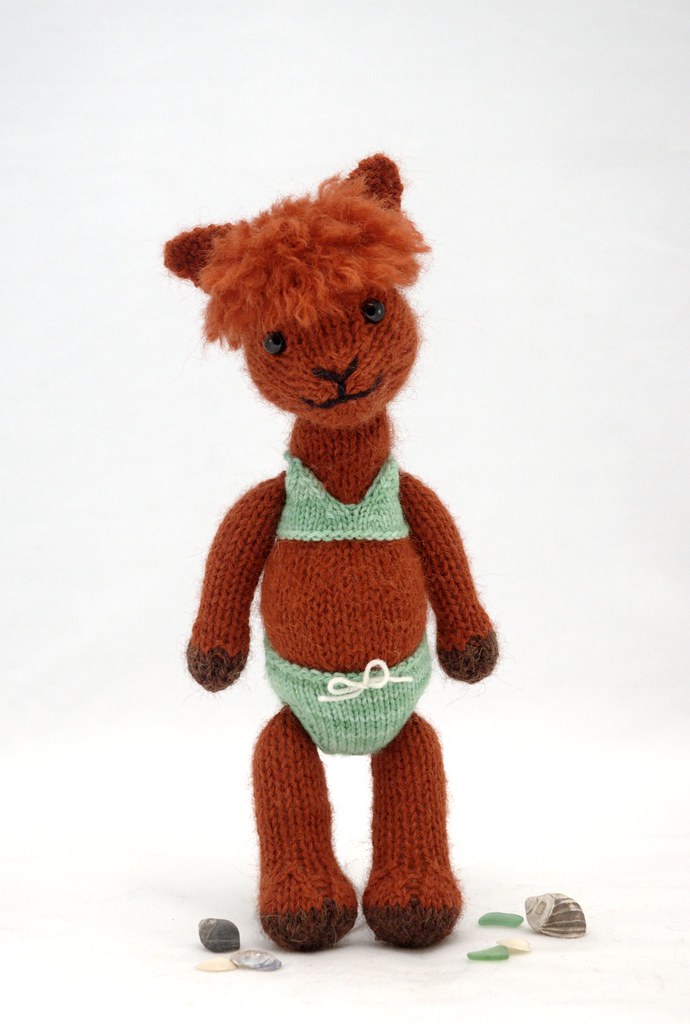
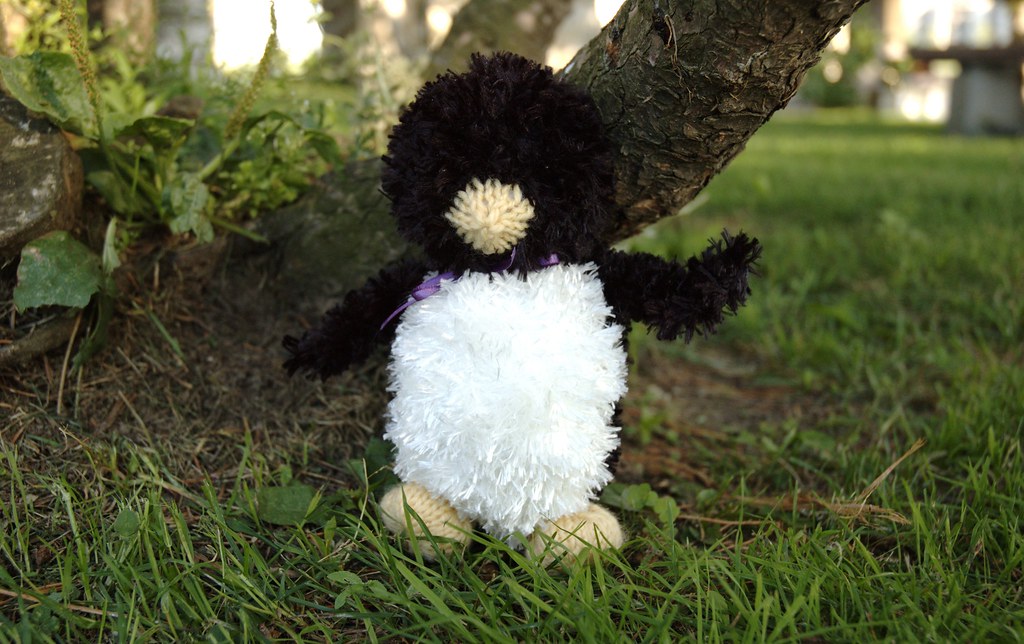
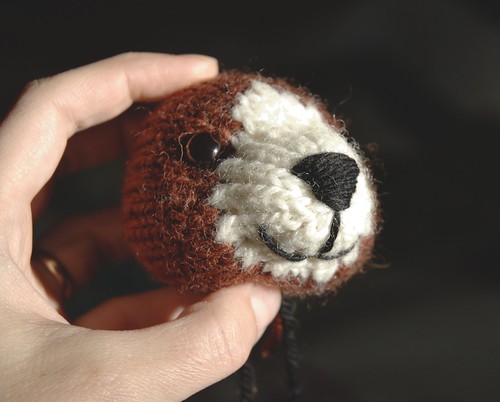
There are a few projects from my new holiday pattern popping up on Ravelry. It seems that the baby seal is more popular. These ones by feltalicious7 are very cute. She did make a comment about the head being difficult to shape, so I thought I would offer a couple tips.
First, the most important step to making your knit toy look it's best (after knitting everything correctly) is stuffing it. It takes some patience and practice to get just the right amount of stuffing in each body part, smooth it out, and then add a little extra where it's needed. Even after you sew it closed, you can move stuffing around with a darning needle, and smooth it out with your hands. A toy that's well loved will get squashed over time, but you can replace the stuffing, or adjust the existing stuffing with a darning needle. To use the darning needle, insert it halfway into where you need to adjust the stuffing. Wiggle it around, moving the stuffing to where you need it. You can also insert the needle just under the knit fabric, and wiggle it around to smooth out lumpy stuffing. Practice a bit, it can be fun!
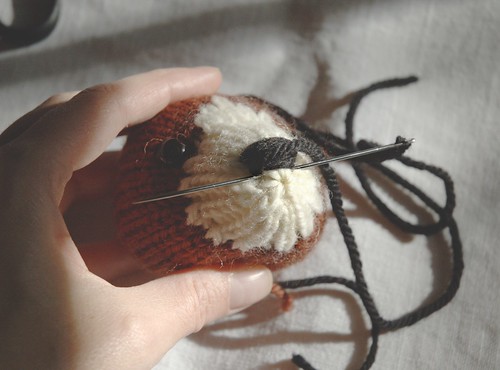
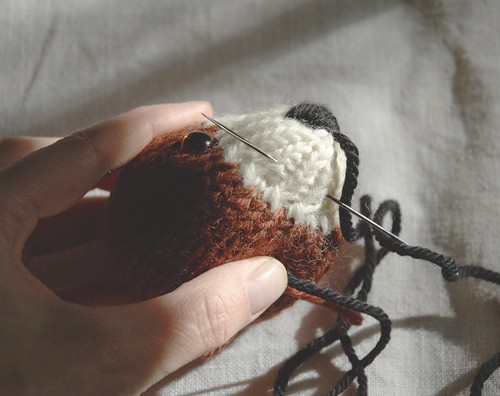
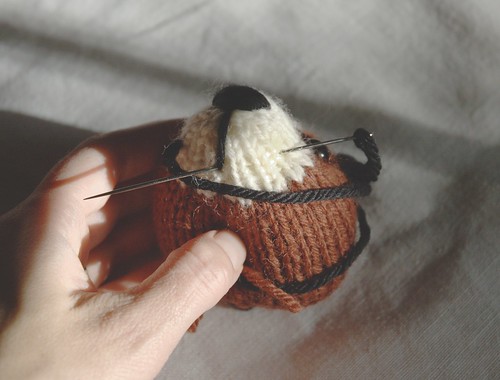
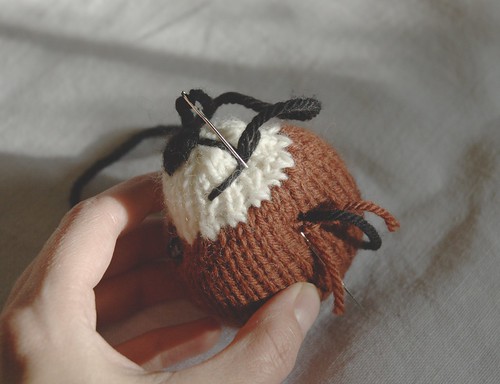
The second tip is that you can also make stitches on the face to pull in the fabric under the eyes and make the nose more prominent. (I will try to make a video tutorial of this, as it's a trick I use on most toys, but it's hard to convey in written instructions). Basically, put about 12" of yarn the colour of the face on a long sharp needle, then insert your needle under the chin, and have it exit just under one eye. Pull the needle through, leaving 3" of yarn where you entered. Make a 1/4" stitch under the eye, then thread your needle back to where you started. Tie together the two strands of yarn - this will pull in the fabric under the eye. When it looks good, make the knot secure. Without cutting your yarn, repeat for the other eye. Then weave in your yarn ends. It may take a couple tries to get the hang of it, but it can really improve the look of the face, especially for toys which need a more prominent muzzle.
Showing posts with label hints. Show all posts
Showing posts with label hints. Show all posts
Wednesday, December 5, 2012
Wednesday, June 27, 2012
hint #12
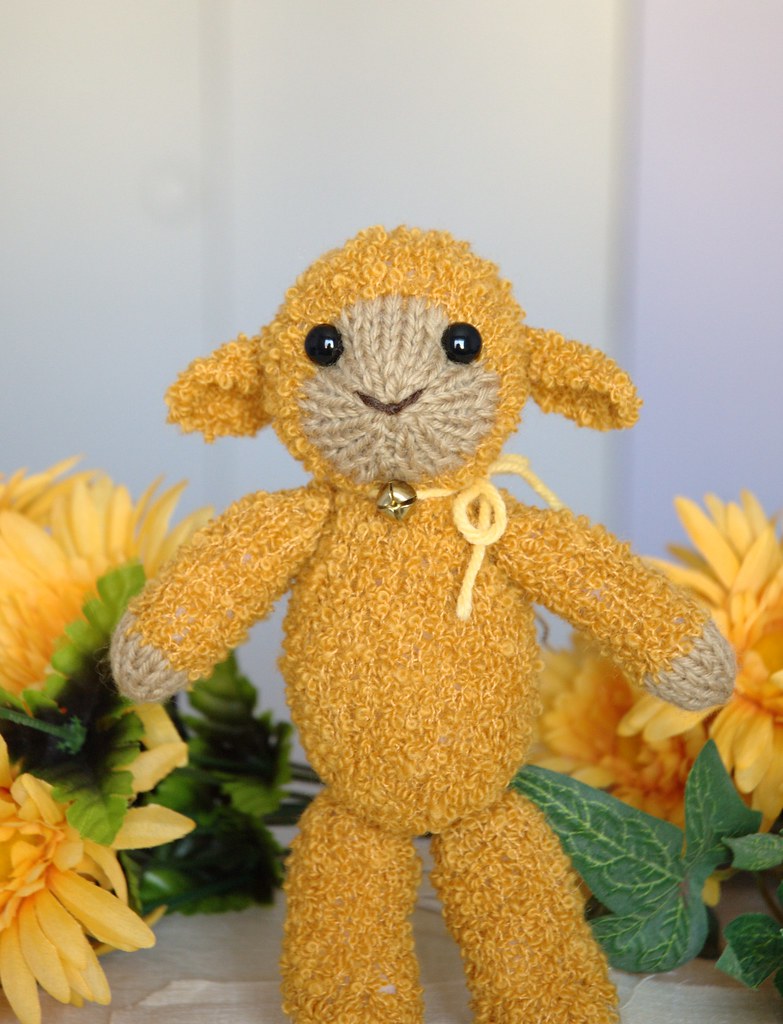
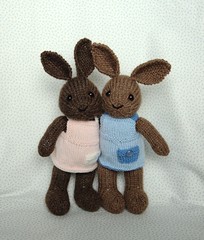
I knit a few Pookies in the Spring to give away as gifts, and also because I wanted to try out Knit Pick's Chroma worsted yarn for this toy. I thought if I worked from opposite ends of a ball, I could still get stripes, and make a bunch of toys that coordinate in a really fun way. It worked out super well, and only once did I have to skip a stripe in the ball of yarn so I could get different colours from each end. I tried the mid-winter colourway, having a little left from the Savannah Chaps, and the lollipop colourway, which turned out very bright! (Sorry, I don't have a photo of those, but will try to get one soon). To make it simple, you could use the Chroma yarn in the brown, grey, or natural colours to make the heads. For most of the toys* I used Sugar Bunny yarn to make the toys extra fuzzy, but it is a bit finer, and you can see the change in gauge if you look closely.

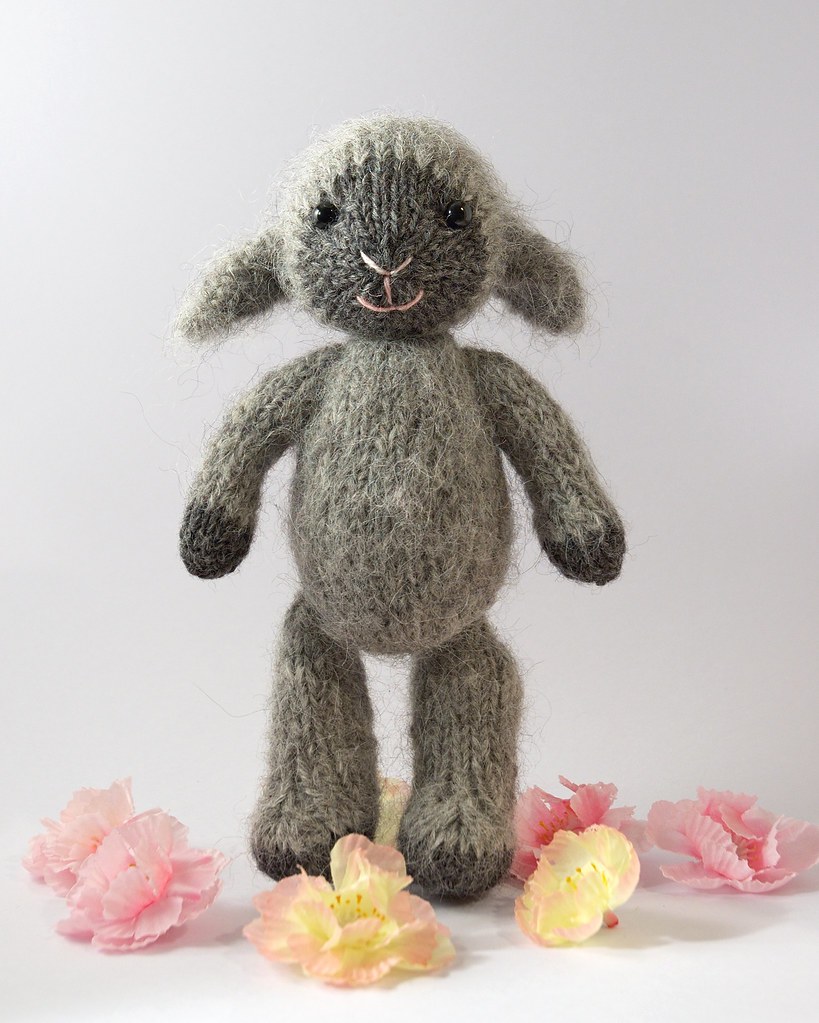
Besides trying out a new yarn for this pattern, I also tried a new animal. Being Spring, I though I would try making a lamb! It's very easy to modify the pattern to make a lamb: you'll need a bit of felt, and be comfortable with hand-sewing, to make one like the lamb in the photo above. Also note that the hood won't fit if you sew the ears on this way, but it's still cute without the hood.
To start, work the body and then the head up to Row 14, then turn the toy inside out so you can weave in the yarn ends. Turn the toy right side out. Next, cut an oval from paper, about the size you want the face. Try it on the toy's face, to see if you have the size and shape right. When you're happy with it, mark where you want the eyes. Use this as a pattern to cut the lamb's face from felt. Transfer the eye marks to the felt, and use sharp scissors to cut tiny slits for the safety eyes. Place it on the lamb's face, and pin in place. Insert the safety eyes, since they will help hold the felt while you sew it on. With hand-sewing needle and matching thread, sew the felt to the knitted face (a whip-stitch works well for this).
Now you can stuff the toy, and finish the toy body as written in the pattern. To make the lamb's ears, knit the bunny ears from the pattern, with this alteration: once you reach Row 3, work only 3 rows of stockinette (instead of 6), and then work the decreases. To finish, sew the ears to the sides of the head, and embroider a nose and mouth. Embellish the finished toy as you like!

Here's a bunny I made from the Pookies pattern, using the last of the mid-winter colourway.
*For those interested, I used Knit Pick's Suri Dream for the lamb's fuzzy fleece - a discontinued and much missed yarn! As a substitute, I find a 100% alpaca yarn, especially single-ply, gives a similar soft, fuzzy look.
Friday, January 14, 2011
hint #11
Over the years, I have been asked many times to design an underwear pattern for my toys. My first thought was always, "but, they're stuffed animals!" However, I've been asked often enough by now that I decided it's time to offer a couple of suggestions here. I wanted to design a simple free pattern, but some other things are keeping my hands full (such as a busy toddler). Whenever I do find the time, I will add the pattern to this post.
Both these suggestions are for my standard 8" size toy (like this or this), although the first would also work for the big teddy and bunny patterns.
My first suggestion is quite simple: work the last 1/3 of the body rows in white yarn (or yarn co-ordinating with the toy's outfit). If the pattern you have is older and doesn't include row counts (and you don't feel like counting them yourself), you can start the white on this row:
Next: k3, m1, k1, m1, k27, m1, k1, m1, k3. (39 sts)
My second suggestion is to use either the bikini bottom from my Alpaca pattern, or the shorts from my Koala pattern (although you will want to shorten the legs on these). The lederhosen in Clothing Bundle 3 is also similar to the shorts, so you could try that pattern as well.
Thursday, February 18, 2010
hint #10
Several people participating in the knit-along over on Ravelry have had some challenges using very fuzzy or bouclé yarns for their lambs. Someone suggested that I share any tips I have over here, so that everyone can benefit! So, I'll give you a few tips that have helped me with these types of yarn, and if you have any to share, please leave a comment.
I've noticed it myself, and I've heard others comment, that bouclé yarns can make your hands hurt when knitting them at such a tight gauge. Most of my toy patterns are designed to be knit with worsted weight yarn on 4 mm needles (so slightly tighter than you would normally knit with this yarn weight). However, most bouclé and fuzzy yarns are bulky weight, and it can be a real strain knitting them on 4 mm needles! My first suggestion would be to go up a needle size or two, and not worry that your toy is going to be bigger than the usual 20 cm (8").
My second suggestion is to try to find a fuzzy/bouclé yarn that is closer to worsted weight, or works better on 4 mm needles. The lamb above was knit with some wool bouclé yarn I was lucky to find at a thrift store (sadly a discontinued brand). I also love using Knitpick's Suri Dream - even though it's described as super bulky, because it's a fine strand with lots of fuzz you can knit it on 4 mm needles with no trouble. Something like that might be just the solution you need!
Another trick that can sometimes help is to work more loosely than normal the rows preceding lots of increases. Just going slowly and being careful to purl these rows a bit looser, can make it so much easier to get in all those m1 stitches on the next row!
Next, many people have said you can't see your stitches at all with these fuzzy yarns. Some I've knit with, I can't even tell which is the right side, and which the wrong! Simple but true: a row counter keeps you on track! My newer patterns all have row counts, so it's easier to tell where you are. If you're also having trouble making some of the decrease stitches, you can fudge things a little. I've found that skpo can be much easier to work than k2tog, so use it instead. And on the wrong side, nobody will notice if you use p2tog, instead of p2tog tbl (which can be tricky at the best of times!)
Finally, it can often be nearly impossible to sew up the seams with nubbly yarns. Save yourself some hair-pulling, and find a bit of smooth yarn to match your main colour (if you're really good at seaming, this yarn barely shows, so it doesn't need to match all that closely). Rather than using your cast-on or tag ends to sew up the seams, cut a long piece of the smooth yarn, and start sewing at one end, leaving a nice long tail. Once the seam is all done, and the piece stuffed, you can run this extra end through the stuffed piece a few times to anchor it, then snip off the excess.
I hope these tips are helpful to you, and please remember to leave a comment if you have some helpful tips of your own!
*Sorry, I don't remember what brands I used for these toys, but they were your usual craft-store novelty yarns.
I've noticed it myself, and I've heard others comment, that bouclé yarns can make your hands hurt when knitting them at such a tight gauge. Most of my toy patterns are designed to be knit with worsted weight yarn on 4 mm needles (so slightly tighter than you would normally knit with this yarn weight). However, most bouclé and fuzzy yarns are bulky weight, and it can be a real strain knitting them on 4 mm needles! My first suggestion would be to go up a needle size or two, and not worry that your toy is going to be bigger than the usual 20 cm (8").
My second suggestion is to try to find a fuzzy/bouclé yarn that is closer to worsted weight, or works better on 4 mm needles. The lamb above was knit with some wool bouclé yarn I was lucky to find at a thrift store (sadly a discontinued brand). I also love using Knitpick's Suri Dream - even though it's described as super bulky, because it's a fine strand with lots of fuzz you can knit it on 4 mm needles with no trouble. Something like that might be just the solution you need!
this lamb was made with Suri Dream
you can't see stitches at all with yarn* like this
this guy was knit with eyelash* yarn - so difficult, but so cute!
Finally, it can often be nearly impossible to sew up the seams with nubbly yarns. Save yourself some hair-pulling, and find a bit of smooth yarn to match your main colour (if you're really good at seaming, this yarn barely shows, so it doesn't need to match all that closely). Rather than using your cast-on or tag ends to sew up the seams, cut a long piece of the smooth yarn, and start sewing at one end, leaving a nice long tail. Once the seam is all done, and the piece stuffed, you can run this extra end through the stuffed piece a few times to anchor it, then snip off the excess.
I hope these tips are helpful to you, and please remember to leave a comment if you have some helpful tips of your own!
*Sorry, I don't remember what brands I used for these toys, but they were your usual craft-store novelty yarns.
Friday, October 16, 2009
Nose and Mouth Tutorial
At long last, a tutorial for embroidering the nose and mouth! I'm going to be brief, since I'm trying to get this done while Baby Mitten naps. The photos aren't great, because I was trying to chase the sun around my dining table, while holding the camera in my right hand, and the toy in my left. Anyway, I may add more details to the descriptions later if they're not clear enough.
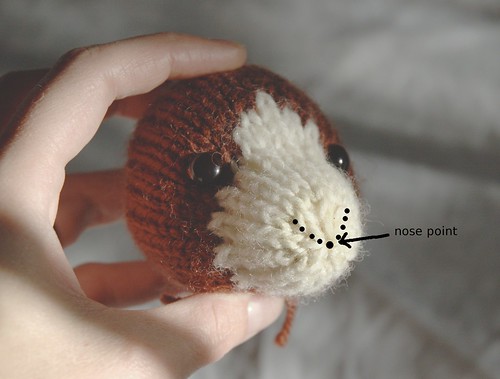
Step 1: Head knit, stuffed, sewn closed, and eyes attached. I've also done a little shaping as described in this blog post. The columns of knit stitches make a good guide to follow for the shape of the nose, as they make a v-shape as they're gathered in at the nose point.
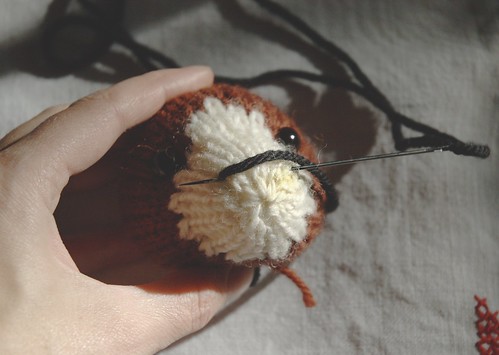
Step 2: Insert the needle with yarn from the bottom centre of the head, and have it emerge about a third of the distance between the nose point and the eye. (A long sharp needle with a large eye makes the embroidering much easier). Pull yarn through, leaving a short tail on the bottom of the head.

Step 3: Insert the needle on the opposite side of the head, trying to get it as symmetrical as possible (this often takes a few tries) and have the needle emerge back on the first side, just below where you started. Pull yarn through, but not too tight or the nose will pucker.
Step 4: Continue as in Step 3, following the lines of knit stitches towards the nose point. Each stitch should be slightly shorter than the one above.
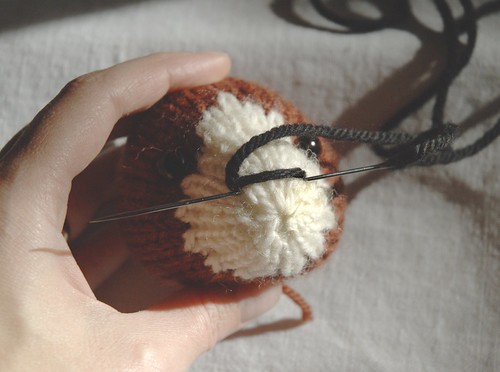
Step 5: Nearly there. If you find you haven't placed your stitches close enough and the nose is patchy, add extra stitches to fill in, or pull out what you've done and go back to do it better.*
Step 6: One you've reached the nose point, which should be where you finish with the shortest stitch, have the needle emerge right in the centre of the nose point. Insert the needle directly below the nose to make a vertical stitch (however long you like). Then, have the needle emerge to the side of the muzzle (again, the size of the smile depends on your preference). Pull yarn through.
Step 7: Insert the needle on the opposite side of the muzzle, checking from the front for symmetry, and have it emerge at the bottom end of your vertical stitch. Pull yarn through, but not too tightly.
Step 8: Finally, insert the needle into the same place you just came out from, catching the horizontal stitch of the mouth by making a loop over top of it. Your needle should come out at the bottom of the head, where you started this business. Pull yarn through and snug up the loop holding down the smile.
Step 9: Knot yarn ends securely and cut off about 2.5 cm (1") long. Admire handiwork before getting on with the rest of the toy.
If you need a closer look at any of the images, just click on the photo and it will take you to the Flickr page where you can look at a larger size.
* Honestly, in spite of the large number of toys I've made, I often have to rip out the face and do it over. This is usually the result of impatience or lack of attention, so don't despair that a little practice will make it easy-peasy for you :)
Step 1: Head knit, stuffed, sewn closed, and eyes attached. I've also done a little shaping as described in this blog post. The columns of knit stitches make a good guide to follow for the shape of the nose, as they make a v-shape as they're gathered in at the nose point.
Step 2: Insert the needle with yarn from the bottom centre of the head, and have it emerge about a third of the distance between the nose point and the eye. (A long sharp needle with a large eye makes the embroidering much easier). Pull yarn through, leaving a short tail on the bottom of the head.
Step 3: Insert the needle on the opposite side of the head, trying to get it as symmetrical as possible (this often takes a few tries) and have the needle emerge back on the first side, just below where you started. Pull yarn through, but not too tight or the nose will pucker.
Step 4: Continue as in Step 3, following the lines of knit stitches towards the nose point. Each stitch should be slightly shorter than the one above.
Step 5: Nearly there. If you find you haven't placed your stitches close enough and the nose is patchy, add extra stitches to fill in, or pull out what you've done and go back to do it better.*
Step 6: One you've reached the nose point, which should be where you finish with the shortest stitch, have the needle emerge right in the centre of the nose point. Insert the needle directly below the nose to make a vertical stitch (however long you like). Then, have the needle emerge to the side of the muzzle (again, the size of the smile depends on your preference). Pull yarn through.
Step 7: Insert the needle on the opposite side of the muzzle, checking from the front for symmetry, and have it emerge at the bottom end of your vertical stitch. Pull yarn through, but not too tightly.
Step 8: Finally, insert the needle into the same place you just came out from, catching the horizontal stitch of the mouth by making a loop over top of it. Your needle should come out at the bottom of the head, where you started this business. Pull yarn through and snug up the loop holding down the smile.
Step 9: Knot yarn ends securely and cut off about 2.5 cm (1") long. Admire handiwork before getting on with the rest of the toy.
If you need a closer look at any of the images, just click on the photo and it will take you to the Flickr page where you can look at a larger size.
* Honestly, in spite of the large number of toys I've made, I often have to rip out the face and do it over. This is usually the result of impatience or lack of attention, so don't despair that a little practice will make it easy-peasy for you :)
Saturday, July 25, 2009
converting to the round
I know I must have said it here a few times before, that my little toys are great practice for seaming knitted items. I've done so many now that sewing seams is just a small step to finishing them. However, I know many knitters dislike seaming, or even hate it (I even saw a Ravelry group for knitters who hate seaming)! So I've put together a set of steps that should help you convert most of my toy patterns to be knit in the round.
1. The first step would be your choice of dpns (double pointed needles) or circular needle. Since all the body parts have different numbers of stitches, and some people prefer sets of 4 or 5 needles, I will have to leave it up to you to decide how to divide the stitches between the dpns. However you divide them, you will sometimes have to shuffle stitches between the needles, because the increases and decreases are not evenly spaced around the body parts. As for a circular needle, if you haven't tried the magic loop method, this would be a great time to learn! It's especially useful for knitting things with small numbers of stitches, like toy arms and legs.
2. The next step is fairly simple: convert purl stitches to knit stitches, and every time you see 'P 1 row' you want to work that as a knit round. Also, on the small toy feet, you will need to change one row:
3. Lastly, you will need to stuff (and attach safety eyes) before knitting the last few rows of each piece and closing them up. Except for the body, which has a large opening at the neck.
There are a few things that will be different when you knit my toys in the round. First, because all the body parts have an extra stitch along each edge, which are usually taken up within the seam, body parts knit in the round will be 2 stitches fatter.
Second, working intarsia colour changes in the round is rather tricky, although I know it can be done. This makes some of the toys more challenging, such as the puppy or monkey. You can try working the intarsia in the round for these toys, or just knit the heads flat, and the rest of the toy in the round.
Third, many of the clothing patterns are knit flat with seams. Because they are so different from the toys, and each other, it would make this post much too long and confusing to include them here.
 one of the clothing patterns that is knit in the round
I've tried to make this post quite simple and general, so it will apply to as many of my patterns as possible. If you are working on a particular pattern, and find a spot where you need some advice or help, we can start a discussion over on Ravelry. This way everyone has access to my tips or other's suggestions for converting to the round. (if you don't belong to Ravelry, feel free to email me for advice too)
1. The first step would be your choice of dpns (double pointed needles) or circular needle. Since all the body parts have different numbers of stitches, and some people prefer sets of 4 or 5 needles, I will have to leave it up to you to decide how to divide the stitches between the dpns. However you divide them, you will sometimes have to shuffle stitches between the needles, because the increases and decreases are not evenly spaced around the body parts. As for a circular needle, if you haven't tried the magic loop method, this would be a great time to learn! It's especially useful for knitting things with small numbers of stitches, like toy arms and legs.
2. The next step is fairly simple: convert purl stitches to knit stitches, and every time you see 'P 1 row' you want to work that as a knit round. Also, on the small toy feet, you will need to change one row:
After: k8, [skpo] twice, [k2tog] twice, k8.
Work: k6, [skpo] twice, [k2tog] twice, k6.
3. Lastly, you will need to stuff (and attach safety eyes) before knitting the last few rows of each piece and closing them up. Except for the body, which has a large opening at the neck.
There are a few things that will be different when you knit my toys in the round. First, because all the body parts have an extra stitch along each edge, which are usually taken up within the seam, body parts knit in the round will be 2 stitches fatter.
Second, working intarsia colour changes in the round is rather tricky, although I know it can be done. This makes some of the toys more challenging, such as the puppy or monkey. You can try working the intarsia in the round for these toys, or just knit the heads flat, and the rest of the toy in the round.
Third, many of the clothing patterns are knit flat with seams. Because they are so different from the toys, and each other, it would make this post much too long and confusing to include them here.
one of the clothing patterns that is knit in the roundI've tried to make this post quite simple and general, so it will apply to as many of my patterns as possible. If you are working on a particular pattern, and find a spot where you need some advice or help, we can start a discussion over on Ravelry. This way everyone has access to my tips or other's suggestions for converting to the round. (if you don't belong to Ravelry, feel free to email me for advice too)
Friday, November 14, 2008
hint #9

I've been asked many times how I shape the heads of my toys so they don't just look like round blobs. While proper stuffing helps a lot, I have a little trick that helps the face keep it's shape.
Here you can see a very basic diagram I've drawn. It shows the toy head from the front, so you see both eyes and the nose. The blue line shows the seam. I have drawn the diagram as if you were using safety eyes, so they are already attached.
The purple lines show where to make the stitches to shape the head. You'll need a tapestry or soft-sculpture needle with about 12" of yarn the same colour as the face. Insert your needle with yarn at the bottom of the head, have it come up just under one eye, and make a short stitch towards the centre of the face. Have the needle and yarn exit the head near when you started. Then snug up the yarn to shape the face, and knot the yarn securely. Repeat this for the other eye.
If you are using buttons for eyes, the process is the same, except you are making the stitches through the buttons, and you'll want to use heavy thread instead of yarn. Passing the thread through the button 3 times is usually enough to hold it on securely. This process also allows you to hide the yarn or thread ends when you sew the head to the body.
I hope this was helpful! I am thinking of making a video of the process for my blog, but I'm not sure when I will have time to do that.
Monday, September 22, 2008
hint #8

I haven't posted any hints in a long time, so here's a little advice on something I was thinking about this morning.
Stuffing a knit toy properly goes a long way to making the toy look great, and it's not quite as simple as it might seem. Stuffing a cloth or crocheted toy is much easier, because the fabric is not stretchy, so you just stuff until you can't fit any more, and the finished toy should end up the shape you intended. However, knitted fabric is very stretchy, even when knitted on smaller needles, as my toys are. So if you don't get the stuffing quite right, the finished toy can look lumpy or with strangely shaped body parts.
The type of stuffing you have will make a big difference as to how you go about stuffing the toy. I've only ever used polyester fibre fill, because that's what I can get, so my discussion will be limited to that. If you've used cotton or wool stuffing, feel free to leave a comment about how those work. Polyester stuffing tends to be either light and springy, or soft and dense. I like the springy kind because it's less lumpy and the toy ends up squishier. The soft kind will pack in tighter, giving your toy more weight.
With the springy stuffing, you can just pull off a chunk thats about 1/3 to 1/2 bigger than the piece you're stuffing, stuff it into the body part, and squish it around until the shape seems right. Adding extra bits if you haven't enough rarely leaves lumps on the surface. Adding a bit extra in the nose and for round cheeks makes the head look much nicer, rather than just having a round or oblong blob.
With the soft kind of stuffing, you'll want to pull off a chunk, and roll it around in your hands until it seems about the right size and shape for whatever piece you're stuffing. If you need a bit more, be careful how you add it so you don't end up with lumps. Then carefully put the stuffing into the body part so it fills it out evenly. If you're stuffing a bunny leg, you can do it with two pieces: one for the foot, and one for the leg, squishing the stuffing around a bit so there's no obvious gap between the two.
If you notice any lumps after you've sewn the piece closed, you can use a darning needle as a sort of lever to smooth out the stuffing. Just insert the needle into the lump, and wiggle it into a better position. It does take some practice to get it just right the first time, so try not to get frustrated!
With either kind of stuffing, you'll want to make sure you don't over-stuff the pieces, because the stuffing will show through the knit fabric and look ugly. You won't be able to get a very firm toy with a knit fabric, but I find knitted toys to be quite squishy and cuddly, which is good in it's own way :)
Thursday, April 10, 2008
hint#7
To quote my husband,"let's get back to fun toys and happy occasions." Don't you agree?
Here's another little tutorial, this time on how to sew on a toy's head, or as I think of it: capitation (as in the opposite of decapitation :)
I use a sewing stitch called ladder stitch, which is shown in the diagram below.
 Ladder stitch: dotted lines show where yarn is going behind fabric. When doing this yourself, you would pull the stitches tight enough for the fabric edges to meet.
 Head and body stuffed and ready to go.
 Pin on the head so it stays straight, matching up the back seams (drawn in black).
I would usually use those yarn ends from sewing up the body to sew on the head, but I've used white yarn here to make it clearer what I'm doing.
 Starting at the back seam, sew the top edge of the body to the head where they meet. I have left the stitches loose so they are easier to see, but you will want to tighten them up so the head is sewn on securely.
 Here you can see the head half attached. Compare the white stitches to the diagram above if you're not clear on how I'm making the stitches.
 Head sewn on all the way.
If the toy is for a young child, I will usually go around a second time.
 To tidy up the yarn ends, insert the needle a few inches through the body, making sure to exit at a hole in the knit fabric, and pull yarn through.
 Insert the needle back into body exactly where the yarn exited, and pull yarn through until loop disappears beneath the knitted fabric.
 Snip off yarn close to the body, and pull gently at the fabric until the yarn end slips inside and cannot be seen. This method will secure your yarn ends without having to use knots. Repeat for other yarn end.
 Here you can see the head sewn on with matching yarn. With patience and practice, you can barely see the stitches that hold the head to the body.
I hope this was helpful! If the pictures aren't clear enough, check the larger sizes on Maybe with some more help I can get other tutorials made. It's a little tricky with just me trying to arrange things and take photos!
Here's another little tutorial, this time on how to sew on a toy's head, or as I think of it: capitation (as in the opposite of decapitation :)
I use a sewing stitch called ladder stitch, which is shown in the diagram below.
 Ladder stitch: dotted lines show where yarn is going behind fabric. When doing this yourself, you would pull the stitches tight enough for the fabric edges to meet.Head and body stuffed and ready to go.Pin on the head so it stays straight, matching up the back seams (drawn in black).
I would usually use those yarn ends from sewing up the body to sew on the head, but I've used white yarn here to make it clearer what I'm doing.
Starting at the back seam, sew the top edge of the body to the head where they meet. I have left the stitches loose so they are easier to see, but you will want to tighten them up so the head is sewn on securely.Here you can see the head half attached. Compare the white stitches to the diagram above if you're not clear on how I'm making the stitches.Head sewn on all the way.If the toy is for a young child, I will usually go around a second time.
To tidy up the yarn ends, insert the needle a few inches through the body, making sure to exit at a hole in the knit fabric, and pull yarn through.Insert the needle back into body exactly where the yarn exited, and pull yarn through until loop disappears beneath the knitted fabric.Snip off yarn close to the body, and pull gently at the fabric until the yarn end slips inside and cannot be seen. This method will secure your yarn ends without having to use knots. Repeat for other yarn end.Here you can see the head sewn on with matching yarn. With patience and practice, you can barely see the stitches that hold the head to the body.I hope this was helpful! If the pictures aren't clear enough, check the larger sizes on Maybe with some more help I can get other tutorials made. It's a little tricky with just me trying to arrange things and take photos!
Thursday, March 20, 2008
hint #6
There's a certain way I sew together the cast-on edge of feet, arms, and the back of heads that gives them a nice rounded shape, rather than having a straight seam. I thought I would share that technique, and I've taken a bunch of photos to help illustrate. They're a little out of focus, because there isn't a lot of light and I had to hold the camera rather than use a tripod. Hopefully you can make out what I'm doing, and try it yourself.
 A leg, ready to be sewn.
 I use a long tail cast-on, which leaves nice loops along the edge. Other kinds of cast-on will look different, but should still work.
 Thread the needle through the loops of the cast-on edge, starting from the side opposite to where your yarn end is attached to the leg.
 The needle has been threaded through all the loops of the cast-on edge.
 Pull the yarn through the loops, and pull tight until the bottom of the foot is gathered together. There! Now you have a nice, round bottom to the foot. You can continue sewing up the back seam of the leg with the yarn.
Tuesday, March 11, 2008
comments and eyelashes
So many nice comments! I guess you guys like the hippos :) I am glad. The idea just came to me last week and I decided to act on it before I got too busy. I had been thinking on and off about designing an elephant, but there are some really nice elephant patterns, and I wanted to do something different. Suddenly I could see the hippo in my head, and it just made me happy! Although, the mouth was something that just sort of happened on the way to another idea, but I love how it looks.
Okay, enough gushing.
And what's with the naughty comment about the boy hippo? Ah well, we're all adults here, right? and it did make me chuckle. In my mind they're like kids playing dress-up, as one commenter said, and I tend not to see such things :) You've all thought of such awesome names, I can hardly wait to see which ones get picked! I did want to mention that the final pattern will be such that you can make your toy a boy or girl, I just made one of each because I like to be fair.
Have I ever shared how I make the eyelashes? It's very simple really. I use a strand of black heavy-duty thread, and knot it securely around the back of the eye, then trim it to the length I want. They stay on pretty well if the toy is just for display, but I'm not sure if they would stand lots of playing. I guess you could just replace them if they come off.
Monday, March 3, 2008
odds and ends
I know I mentioned something last week about a surprise. Well, it's another little give-away contest. Problem is, I can't think of a good idea for a contest, so until I can think of something fun for you to do, the prize will wait. (this has nothing to do with the prize being so cute I almost want to keep it for myself)
Another things is, if you haven't found me yet, I'm on Ravelry. My user-name is fuzzymitten, and you can find a bunch of my patterns listed under my real name. If you've bought some of my patterns, please add them to your queue or projects. I love seeing what people have knit. Also, I would love to see more ratings of my patterns, so I know which ones people really like, and which ones they don't.
If it hasn't been obvious before, I have a terrible time remembering little things. Like I said I would post instructions to make longer horns for the cow? We'll just ignore how long ago that was, and get on with it.
 The horns are knit as I-cord on 4.5mm dpn's
Cast on 5 sts.
Work 5 rows in st st.
Next: k2, k2tog, k1.
Work 3 rows in st st.
Next: k1, k2tog, k1.
Break off yarn, thread end through remaining sts, then secure yarn end.
The bit between the horns is knit on 4mm needles
Cast on 6 sts.
Work 10 rows in garter stitch.
Cast off.
Sew the horns to the head just above the ears. Then sew on the extra bit, putting a tiny bit of stuffing under it as you sew it on. The cow as shown is knit just like the pattern, except I changed colours for the snout.
If you were wondering how I got Wayne's nose to be pink when he's knit from white, it's very simple (but might embarrass a big tough guy like him). Use a bit of light pink blush or face power and gently brush it onto the nose until it's the colour you want. The make-up will probably wash off if you wash the toy, but you can just add more powder after washing.
hint #5
Another very talented toy maker just posted a super useful tutorial for putting toys together. She has nice clear pictures of a few different stitches I use regularly. The only comments I might make are that on the vertical mattress stitch, I leave the line of sewn stitches looser so it looks just like another row of knit stitches (I use this stitch for the tops of bunny feet). I also attach the toy limbs so they are jointed, rather than fixed in place, but the technique you use really depends on how you want the finished toy to look.

This simple diagram shows how I attach the limbs, although the stitches across the tops of the limbs are horizontal, not vertical as they appear in the drawing (drawing horizontal stitches is a little hard in 2-D). I run the yarn through each limb 2-4 times, depending on how much loving I think the toy might get :)
This simple diagram shows how I attach the limbs, although the stitches across the tops of the limbs are horizontal, not vertical as they appear in the drawing (drawing horizontal stitches is a little hard in 2-D). I run the yarn through each limb 2-4 times, depending on how much loving I think the toy might get :)
Sunday, January 27, 2008
Hint #4
I've been hearing from a bunch of people that this little apron dress always turns out too large for the bunny (or siamese kitty, since the pattern is nearly the same). I'm not sure why, because I never have any trouble with the pattern, and I don't think I knit all that tightly. However, if you knit a bit looser than average, try going down a needle size or two (to 2.25 - 2.5mm), and adding 3-5 rows to the skirt.
By the way, here's the instructions for the little pocket:
Cast on 10 sts. Starting with a purl row, work 6 rows in st st.
Next row: k across.
Next row: k5, yo, k5.
Next row: k across.
Cast off all sts.
Sew pocket to dress front, and add button.
By the way, here's the instructions for the little pocket:
Cast on 10 sts. Starting with a purl row, work 6 rows in st st.
Next row: k across.
Next row: k5, yo, k5.
Next row: k across.
Cast off all sts.
Sew pocket to dress front, and add button.
Monday, January 14, 2008
hint #3
 If you're making a knitted toy for a baby, you probably don't want to use safety eyes. But embroidering eyes on a knitted surface with yarn often doesn't look as good as you would like. I rarely embroider eyes because I dislike how they look, and it takes too many tries to get them to even look half-decent. I prefer to use felt.
You can just use a simple circle of black felt, maybe with a white dot added, stitched on around the edge. You could even add eyelids or eyebrows with felt or crochet. For a cat, you can use a coloured oval with a pupil of black felt stitched on. Or if you like embroidery, you can embroider eyes onto felt, and then stitch the eye onto the knitted face. I particularly like this last method.
Wednesday, November 28, 2007
hint #2
If you happen to spin wool as well as knit, hand-spun yarn makes beautiful little sheep. This is my first time using hand-spun for a toy, and I love the texture and woolly smell. This sheep was made from some rather expensive Jacob/Corriedale yarn given to me by Deb Woolley of the Irish Ewe. I'm a bit sad the rest of the yarn has to go back to her with the toy.

Tuesday, November 20, 2007
Subscribe to:
Posts (Atom)