Showing posts with label patterns. Show all posts

Friday, February 28, 2020

Bunimals Modifications

Bunimals: Simple toys with many possible modifications

My new toy pattern, called Bunimals (bun+animals), was intentionally designed to be easy to modify into other types of animals. The pattern includes a variety of shapes with the ears and other appendages, while all the other details are kept as simple as possible. This way you can easily modify the pattern by changing the yarn colour or texture, mixing and matching the pieces, or making small alterations to the pieces provided, such as adding or removing length.

One simple modification is to change the yarn colour to better match the animal you want to make, such as using black and white to change the robin into a penguin. Another is to use the frog leg instructions to make legs to add to the other animals.

A more involved modification I tried was to use chunky weight yarn and 5 mm needles to make a larger toy. I used about 75 g of a single colour to knit the seal toy, and it turned out about 50 cm around and 10 cm tall (20"x4"). To make any of the two-colour designs in this way, make sure you have about 60 g of the MC and 15 g of the CC. You’ll also want safety eyes that are 15-18 mm in size.


Below I’ve described a few of the modifications that I imagined when designing the pattern (two I knit, the others I sketched for you), but I hope you use your creativity to make many more!


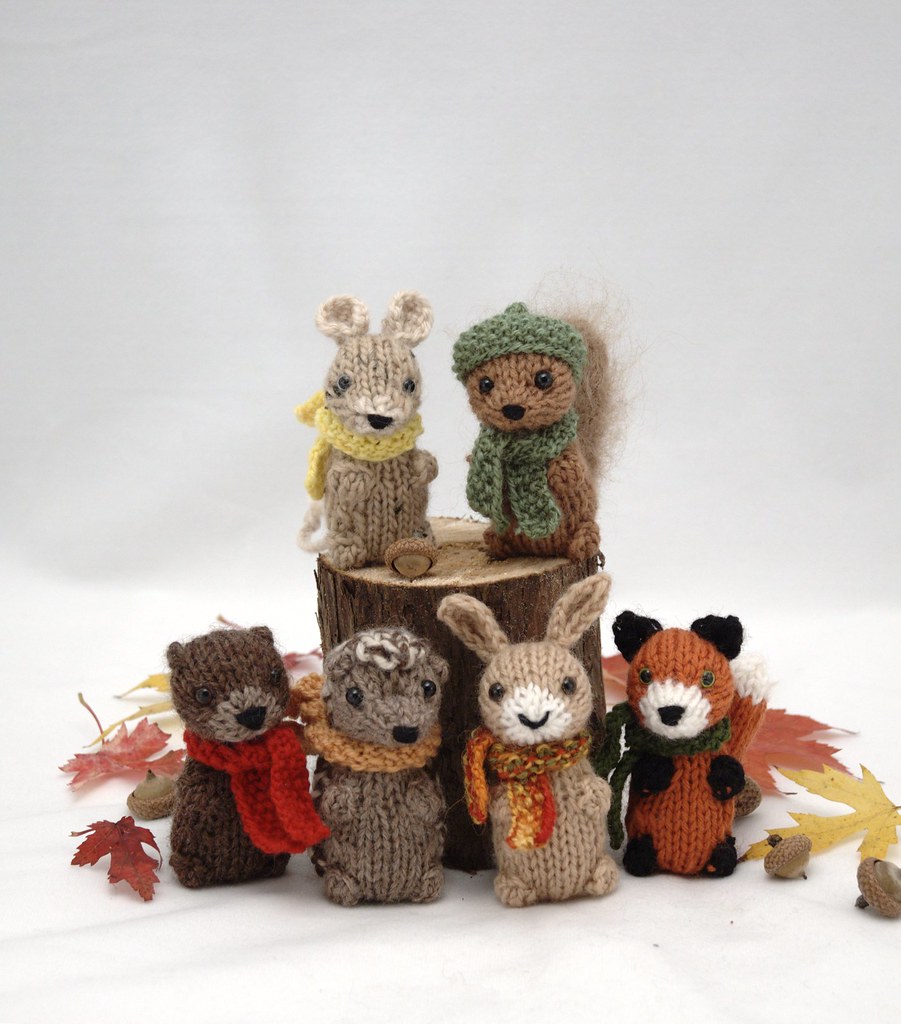
Cat pattern → Squirrel or Fox
To create a squirrel or fox from the cat pattern, choose a reddish-brown or orange yarn for your main colour (MC), and white for your contrasting colour (CC). Then just knit the pieces as written. I also used a fringe/eyelash yarn to knit the tail, adding a few extra rows because the gauge of the fringe yarn is different from the worsted weight yarn. I omitted the bit of CC at the end of the tail to make my toy look more like a squirrel. Embroider a small nose and a happy mouth.


Frog → Seal
To make a seal, you’ll need 50 g of white or grey yarn. Knit the whole body in your colour of choice. Then knit four leg pieces, but leave them un-stuffed. Two of these will be attached at the sides of the face as front flippers. To make the tail flippers, fold the other two leg pieces in half lengthwise, then place them on either side of the seam at the centre-back. Make sure the folded side faces up, and that you catch all the layers as you sew them onto the body. Embroider a V-shaped nose and wider mouth.


Mouse → Panda
To make a panda, you will need 40 g of white for your MC and about 10 g of black for your CC. Knit the body all in white. Before attaching the eyes, embroider small eye-patches with some black yarn, using a duplicate stitch technique. Knit the ears in black, and omit the pink duplicate stitch on the front. If you have enough black yarn, knit the legs from the frog pattern, and add them to the toy. Embroider a medium-size nose and a downward facing mouth.

Mouse → Koala
To make a koala, use grey for your MC and white for your CC, then knit the pieces as written. Embroider the front of the ears with your white yarn (if you have some fuzzy white yarn for this, even better). Embroider a large nose, positioned slightly above the centre of the eyes. A simple mouth works well for this toy.
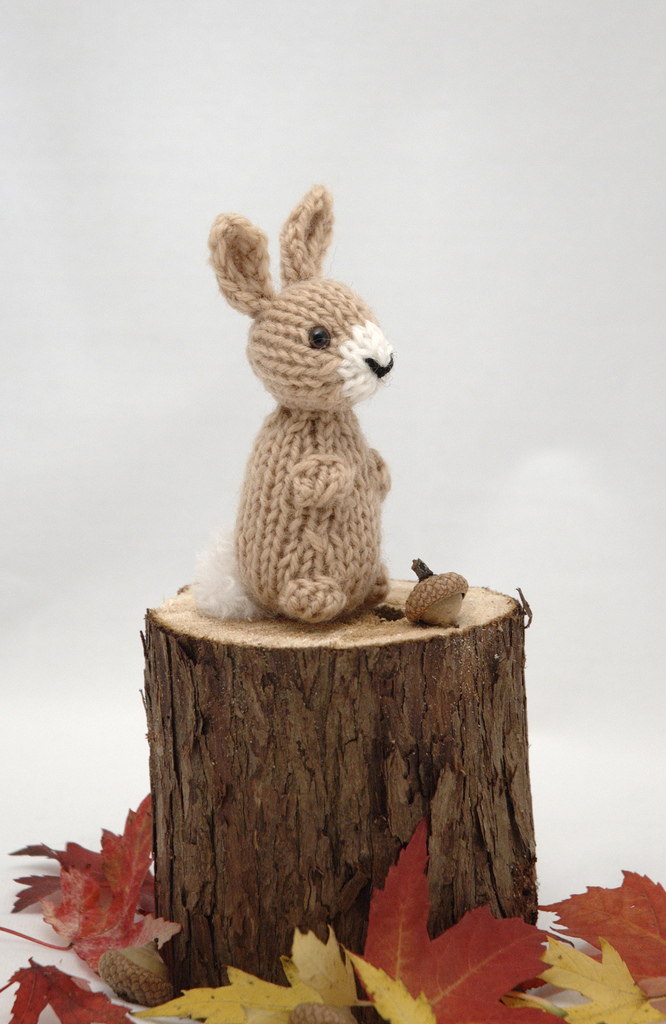
Rabbit → Dog
To make a dog, use a lighter brown yarn for your MC and white for your CC. If you like, use a dark brown or fuzzy yarn for the ears. Knit the body and ears as written, but exclude the tail. Attach the ears to the head so they hang down beside the face. Or, attach the ears pointing up, then fold them forward and sew in place.  After you embroider the nose and mouth with black yarn, embroider a little pink tongue.
For a tail, CO 10 sts with whichever yarn colour you like. Work in stockinette until the tail is about 7 cm (3”) long. Then cut the yarn, thread the end through the stitches, and pull tight to gather. Sew along the tail seam, but don’t add stuffing, so the tail will remain flexible. Attach the tail to the centre-back of the toy body.

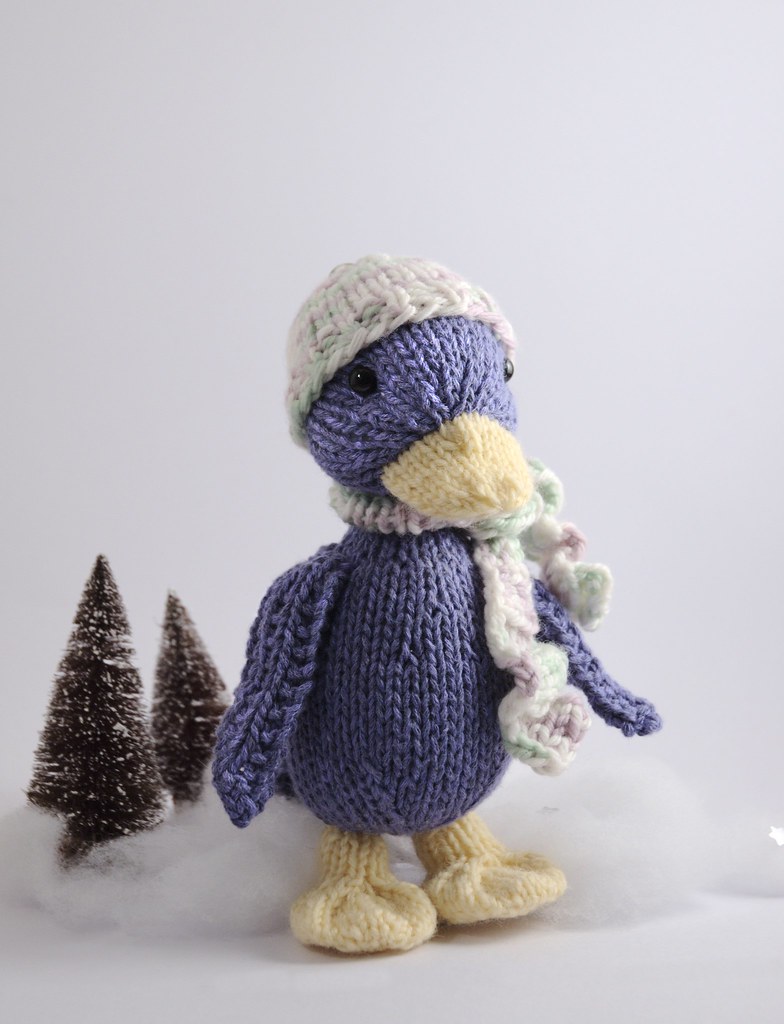
Robin → Chick or Ducking
To make a chick or ducking, you’ll need 50 g of light yellow yarn, plus about 5 g of orange yarn. Knit the body, wings, and tail from the yellow yarn. For a chick, knit the beak from orange yarn. For a duckling, knit a second “tail” piece from orange yarn to make a bill, and add a bit of stuffing. Assemble the toy pieces as described in the pattern.

I look forward to seeing all the adorable toys you knit from this pattern, and please consider sharing any inspiring modifications you create.

Bunimals

I have an adorable and silly new pattern for you today!

Bunimals are bun-shaped animal toys with cat, frog, mouse, rabbit, and robin variations. Each toy uses about 50 g of worsted weight yarn, and they knit up super fast! I designed this toy to be easy to embellish and modify (look for upcoming blog post on this), and a fun way to use colourful or textured yarns.


You can also get the pattern in two versions: knit flat or circular. While I do design most of my toy patterns to be knit flat, because it allows more knitters to be able to make them, this toy design would obviously work well when knit in the round. On Ravelry, simply select the version you want to download. On LoveKnitting, you need to purchase each version separately - flat or circular (I don't like this method, but it's what was allowed on the site. If you buy one version and would like the other as well, please email me).

I look forward to seeing what everyone will make from this new pattern! Please add your projects if you're on Ravelry, so others can appreciate them too.

Monday, November 26, 2018

silky seal pattern

I have a new pattern available for the holidays: a sweet, cuddly seal toy! A slightly different version of this pattern was published a couple years ago, but I've updated it, and you can get it for free until the end of the year (December 31, 2018).


The original toy was knit with Berroco Modern Cotton (in colour 1623), which my 7-year old tells me is very soft and snugly. He's added the toy to the menagerie on his bed, and I regularly find the seal tucked under his chin in the morning. For the second toy, I wanted to try making a smaller size with DK weight yarn, because I know this weight is more common than worsted in some places. I improvised with yarn from my stash, holding together one strand of wool/arcylic sport weight yarn, with one strand of mohair/silk lace yarn. The result gives a lovely soft halo, and both yarns are relatively easy to find in most yarn shops. If you can find a fuzzy DK yarn, even easier for you!


While the head and body are fairly easy to knit, the flippers require some concentration. They are small, though, and quickly accomplished. The sewing-up may test your skills a bit, but a fuzzy yarn is especially forgiving of slightly messy seams. Make your seal extra adorable with oversized black safety eyes! Once the pieces are finished, the final toy comes together quickly, with only the head and front flippers to attach. For an extra cozy seal, you can add a little scarf cut from felt, or knit one from the instructions below. This isn't shown in the pattern photos, but is so easy, I'm sure you can manage ;-)

Simple Garter Stitch Scarf for a toy
Materials: 8-10 g of DK or worsted weight yarn, pair of 3.5 mm (for DK) or 4.5 mm (for worsted) straight knitting needles, tapestry needle
Gauge: not really important, as long as you like it

Cast on 8 sts. Knit in garter stitch until scarf measures 30 cm (12"), or desired length. Cut yarn, and weave in yarn ends. Optional: add a fringe at each end by knotting on extra lengths of yarn.


Tuesday, September 9, 2014

spacebot

The idea of designing a robot toy came to me almost a year ago, and I liked the idea so much, it was difficult to wait for the right time to work on it. But I had other projects planned that my time was committed to, so it had to wait. In the meantime, I did some research (an image search for "cute robots" was very fun). Then I drew some sketches that combined my favourite aspects of the images I found, with the basic body style I use for most of my toys. Below you can see one of these pencil sketches.


Initially I wanted to make two robots with interchangeable parts. I spent a lot of time on this idea, trying to get the different parts to work together, and trying to find a simple way to make some of the shapes I wanted. In the end, though, the second robot was taking too much time, and wasn't working at all how I wanted. Sometimes you just have to let an idea go, so you can dedicate your efforts to what is actually working. Once I made that decision, the final Spacebot toy came together very quickly. (By the way, it's called a Spacebot because that's what my older son said when he saw the sketch, and I thought that name would be better than the generic "robot").


A special feature of this pattern, which might not be obvious from the photos, is that the Spacebot's head can turn! Early in my design process, the possibility being able to swivel the robot's head seemed like too much fun to pass up, even if it made the toy a little more complicated to assemble. In the end, it actually turned out to be relatively simple, although I made sure to add some extra photos in the pattern to help with this part.


Since the final pattern wouldn't have 2 robots, I decided to make my spacebot some accessories. A rocket-pack was a necessity, but I wasn't sure about the second accessory until my husband gave me a little help. When I showed him the two sample toys, he immediately decided they should be called "Domo" and "Arigato". I told him that "Ari" was a nicer sounding name... and then we decided that I would just have to make a robot cat named "Gato" (and now you understand some of the humour you might encounter in our family).


With some good scheduling, and the help of two lovely and speedy knitters, the pattern was test-knit while I was busy getting my older son ready for kindergarten (and so didn't have time for work). Some photos, editing, and formatting happened very quickly, and now I have this adorable and fun new pattern to share with you!

I would say this pattern is intermediate level, but only because of the intarsia on the body and face. Otherwise, the knitting and construction of the toy is very similar to my other patterns. If you really don't want to do the intarsia, the toy would still be cute without it. This pattern is also a great way to play with some of your favourite colours, and to use some of those cute buttons in your stash!

I'm really looking forward to seeing some finished Spacebots, as you find time to knit one (or two!) As a little extra encouragement, the pattern is 20% off until September 19, in both my Raverly and Etsy shops.


These are the toys my test-knitters made, so you can see how well the pattern turns out (and how talented they are)! The robot above was made by Nicole (her Etsy shop), and the one below was made by Alessandra.

Friday, September 20, 2013

backyard bandits

Yesterday I released my newest design, the Backyard Bandits. It's one of my favourite patterns - I feel like I got all the details right, it's fun to knit, and the finished toys have so much personality. It also feels wonderful to be able to share something with you. As much as I enjoyed the contract work I've done this year, it's been hard keeping it all secret.


I wrote about the background of the design previously. Now I'll tell you a little about the actual pattern. I would rate it intermediate level, mostly because of the intarsia you use to make the faces. While the intarsia is not really difficult, you're also making strategic decreases to shape the face, at the same time. So you need to really focus while knitting it. I've included some close-ups of each animal, so you will have a better idea of how the faces look.  However, the rest of the toy pieces are all fairly simple and quick to knit.


The toys are knit from worsted weight yarn on 4 mm needles. You can use a combination of yarns to get a scrappy rag-doll look, as I've done with the fox. Or you can use a single yarn for the main colour, as I've done with the raccoon and badger. The finished toys are 11-12" tall, not including the ears (the fox is a little taller because his legs are longer).  The toys sit well, because of how the body is shaped, and where the legs are attached. You can even put some plastic beads in the body to give it a nice weight. The fox and raccoon both have large, fat tails, which you can brush out to make even fuzzier.


The pattern comes with two little bonuses. First, I've included instructions for a cloth bandanna, which the toys are wearing. It takes about 5 minutes to make, and doesn't require sewing. Second, at the request of my husband, I designed a roasted chicken toy (we recently read Fantastic Mr. Fox to our boys, so this seemed to him like the perfect accessory). The chicken's wings and legs are made with small and large bobbles, but clear instructions for both are included in the abbreviations.


I hope you enjoy the pattern, and I look forward to seeing new projects popping up on Ravelry!

Tuesday, April 9, 2013

beaver with a sweater coat

Please meet the newest Fuzzy Mitten animal: a Beaver, with a beautiful colour-work sweater coat.

The toy is based on my regular-size toy design, and is about 8" tall when finished. He has big feet, a nice pointy nose, little round ears, and a textured tail. The toy itself is fairly easy, knit flat, and then assembled.
The sweater coat is probably the most complicated garment I've ever designed. I've wanted to make something like it for ages, and I thought it would suit a Canadian Beaver. The pieces are all knit flat, then seamed together, and finally you pick up and knit the button-bands and collar. There are large, clear charts for the colour-work design, or you could knit the cardigan in a single yarn. There is a lot of finishing for such a small thing, but you can learn some very useful skills, without spending weeks or months knitting all the pieces! I designed a few other colour-work patterns for the sweater coat, and I hope to publish them as a free add-on to the pattern (sometime in the next month).
Everyone who participated in the Mystery Knit-Along over on Ravelry seemed to have a fun time. There were some people who have been knitting my designs for years, and some people new to my toys. There are many lovely finished beavers now, so you can see just how the pattern will turn out. The KAL was so successful, I will definitely do one again. Plus, there were so many great guesses about what the toy was going to be, I have plenty of ideas for new designs!

Monday, February 11, 2013

lovey for Spring

While it's been awfully quiet around here for the past month, my knitting needles have been busy! I have a new toy design for you, just in time for thinking about warmer weather and the cute baby animals that come with it. The new pattern is called "Flat Foot Floogie" (named by my so-serious husband) and is a lovey with both lamb and rabbit variations. A lovey is not a toy I'm very familiar with, but there seemed to be a lack of cute patterns for them, so I thought I would fill the gap for you.


The pattern is fairly basic and knit flat, but with some nice shaping to keep it interesting. You will need to know stockinette stitch, garter stitch, increasing, decreasing, and how to cast-on stitches at the end of the row. There is some sewing and finishing, but not as much as my usual toys. Plus, the heads are very similar to my other toy patterns, so you could easily make other animals into loveys. I would just recommend adding 2 rows to the stockinette section of the head, to make up for the gauge difference between worsted and chunky yarn. Because thicker yarns vary so much in gauge, the pattern also gives lengths for the yarn requirements. If you're in doubt, make sure you have enough meters or yards - this matters far more than the weight.

While I designed the toy mainly for babies, my two boys (who are 4 and 2) love the test samples I knit. But they both insist the toys are better with a rattle in the head. I made rattle inserts from plastic cosmetic sample jars, by placing a metal jingle-bell inside and then glueing the lid on. However, small ones are fairly cheap to buy on Etsy (just search for "rattle insert" under supplies).

You can now purchase the pattern on Ravelry, Craftsy, or Etsy. If you buy it on Etsy, you will have to wait for me to email the download link (although I'm working on a solution to this).

Thursday, November 1, 2012

dragon with a wee knight and princess

Last Spring, a friend generously gave me the brilliant idea to design a dinosaur. That idea kicked around in my head for a while, and a few months later I drew up a sketch of how I wanted it to look. In the sketch I included a variation for a dragon, and that thought was so inspiring I went out and bought yarn before the end of the week! I found the perfect yarn: brilliant colours, soft to the touch, with just a little sparkle. Within a few days I had the body all knit, and was eager to start on the rest... but then the heat of summer set in. By the end of a busy day playing with the kids, I just wasn't interested in picking up something woolly and using my brain.

We got home from visiting family at the beginning of September, and as soon as the kids were off at preschool, I started working again after a much-longer-than-expected break. I decided to go with a simple pattern to ease myself back in. The Baby Orangutan was something I'd worked on a long time ago, and just needed a few adjustments and an accessory to finish it up. While I was happy with it, I wanted more of a challenge for my next design.

I had a brilliant idea one day during a yoga class (yes, my mind was wandering, but you can't always help that)! I enlisted a friend's help with smoothing out the design and picking colours, found some yarn to knit a sample, and eagerly picked up my knitting needles... Only to fizzle out after a week, when I realized I'd messed up the first part and would have to pull it all out.

At this point I felt a little lost, so I asked my friends which idea they would choose, of the 3 I felt like working on. The vote was unanimous for the dragon. Feeling renewed inspiration for the toy, I set to work again. It came together so quickly - just a few adjustments to the legs, 3-4 versions of the head, and maybe as many for the tail... Anyway! I soon had a design I was very happy with, and then had a brilliant idea for the accessory.  A week or so of furious knitting, next to a sick little boy, and everything was done. My cousin kindly offered to test knit the pattern for me, and had it done in just a few days (she's amazing. I don't know how she got it done so quick, when she's also a graduate student!)

I took some photos, my husband worked his usual magic with the ever-temperamental publishing software, and, "Ta da!"

So, much sooner than I planned, and with a very happy heart, here are the Dragon and his wee friends. Find it on Ravelry or Craftsy. Knit some cuteness!

Saturday, September 29, 2012

baby orangutan

It's been almost a year, but I finally have a new pattern for you! The Baby Orangutan is available in my Ravelry shop. I knit the first one ages ago, and had so many requests for a pattern, I knew it had to be the next design I developed. The final version is a little different, but I think he's cute and clever!


The right yarn, and a few interesting techniques, combine to make the toy look just right. You need a soft, fuzzy yarn in rusty red for the main colour. The face is created with intarsia, while the thumbs are little bobbles, and slipped stitches give shape to the ankles. A little rucksack for adventures seemed like the perfect accessory. This one is knit from fingering weight yarn, and you can make it with or without the flap on top. I decided to use a finer yarn for the rucksack, so it's simpler to scale up for my larger toys.


I haven't had the pattern test knit, since I didn't want you to wait any longer for a new pattern. However, because it's sold on Ravelry, I can easily send you updates if I need to make any changes to the pattern. If you find a mistake, please send me an email or Ravelry message, so I can take care of it right away.


I will have a small number of kits for sale in my Etsy shop, probably tomorrow. I'll post an update when they're ready.

Wednesday, February 1, 2012

in-store pattern sales

I've just signed up for the in-store pattern sales option over on Ravelry. What this means is that brick and mortar local yarn shops can now sell my patterns via Ravelry (while getting a nice percentage of the sale price). If you have a yarn shop and are interested in the program, you can read more about it here.

Most of my single patterns are available this way. I've only excluded some of the older ones that need reformatting, and my two books.* It would be lovely if this new feature on Ravelry brings new customers both to myself and participating yarn shops!


*My two books are already available wholesale. If any yarn shops are interested, please email me.

Thursday, November 24, 2011

savannah chaps

At long last, the new Savannah Chaps pattern is ready for sale! The pattern includes instructions for 3 animals: an elephant, a zebra, and a rhino. The toys can be knit from a single type of worsted weight yarn, or from multiple yarns like my Scraps Chaps pattern. Each toy takes about 50 g (at least 100 yards) of yarn. The zebra is done in 25 g of a main colour, and 25 g of white. Other materials needed are safety eyes or black yarn, stuffing, and a tapestry needle for seaming the pieces. It also includes a bonus pattern for a tiny mouse, knit with fingering weight yarn on 2.75 mm needles.

To celebrate the new pattern, and reward your patience, everything in my Ravelry shop is on sale for 20% off until Sunday night! The discount will be applied when you go to checkout. And if you've been wanting a printed book, they're also 20% off (just click on the book title to see the discounted price).


Monday, May 23, 2011

Pookies on Knit Picks

I'm a little late posting about this here, but if you haven't heard, the Pookies pattern is now available through Knit Picks. Overall, it's the same as the version I released on Ravelry, with just some added instructions for knitters who may not be familiar with my patterns. Most of the extra tips etc. can be found here through my hints and tutorials.

Working with the Knit Picks Independent Designer Program was a great experience, and I would love to work on more patterns with them! However, at the moment my life is full of feeding a chubby baby, keeping up with a busy toddler, tending a growing garden, planning a long vacation to my family in BC, and many other things. Sadly, knitting has fallen far down on my list of priorities. However, we should be back here more regularly at the end of the summer, when I hope to share all these fun experiences with you. And, who know, maybe even a cute toy or two!

Tuesday, February 22, 2011

pdf pattern sale changes

With everything we have to do before our new baby arrives, keeping up with email has gotten to be quite a chore. In order to give myself a bit of a break, I've decided to stop selling patterns on Etsy. However, my Etsy shop will stay open for selling toys, kits, and other odds and ends when I have time to make them. It's always been a bit of a pain selling PDF patterns on Etsy, since I have to list them individually, email them on time (hoping that the email address provided actually works!), and try to keep up with which ones are sold out.

Instead, we'll be switching pattern sales to Ravelry (my website already has a handy link to my shop there). You get to see a lot more info about the patterns, a download link is emailed to you as soon as you pay, and you never have to worry about a pattern being sold out. Besides all this, Ravelry is a great resource and community, and well worth exploring if you love to knit and crochet. Because I won't be able to offer the discount pattern bundles there, we're going to reduce the price of most patterns (excluding a few which are already cheaper there).

Unfortunately, we'll still have to sell our printed books through Lulu (the printer), since Ravelry only does PDF patterns. I know this might be a bit confusing, but the book pages on Ravelry do link to my Lulu shop, if you prefer a paper copy of the books.

I plan to get this done tomorrow (Feb. 23), although it will take me an hour or so to change all the pattern prices on Ravelry. Hopefully this change won't be too confusing for you, and will free up my time to answer your questions and contribute to Ravelry discussions.

Tuesday, February 8, 2011

pookies now available

Can you knit just one of these cute critters? 


The pattern is now available on Ravelry and Etsy (the difference in price is due to fees, but you don't need a Ravelry account to buy the pattern there, and you don't need to wait for me to email it!).*

Here are the main details. Pookies are bean-bag animal toys in 3 sizes (3", 3 1/2", 4"). To make a set of 3 toys (one of each size), you need 50 g each of 3 colours of worsted weight yarn. However, this is a great project for using left-over yarn. The toys are completely knit in the round, on 4 mm DPNs or circular needle (your choice). The ears and hood are knit separately, then attached to the toy. The pattern gives instructions for 5 ear styles: mouse/hamster, bunny, puppy, kitty, and bear. Other materials required are polyester stuffing, ¼ cup dried beans or plastic beads per toy, 3 pairs of 9 mm safety eyes, black yarn to embroider the face, tapestry needle, 2 stitch markers.

If you're a member of my Ravelry group, I would love some photos and feedback on the pattern, since these toys are very different from my other designs.

Happy knitting everyone, and I hope you all have a great day!


*I won't be listing the pattern on Lulu, because their fees are too high, and we're going to move away from selling anything but the books there.

Wednesday, February 2, 2011

a new design!

Goodness, I haven't been around much lately, have I? Well, I certainly haven't been slacking! There have been a few baby knits completed, 2 pairs of socks for Lev (never did get photos of those, and now they are much worn), a custom toy, and a new design!

The idea for the new design came to me from a bean-bag toy Lev was given for his birthday. I loved the size and shape of it, and was amazed by how much he enjoyed playing with it (aren't simple toys often the best?). I had fun over the holidays imagining how I could make my own version of a cute little bean-bag toy, and finally couldn't resist any longer. I know I had planned to spend this year updating old patterns (as well as, you know, having a new baby and all that entails!), but sometimes the urge to create will not be still.

I dug through my stash to come up with as many odds and ends of bright colours as I could find, and quickly knit up 5 of the little guys! Really, each one takes about 2-3 hours from start to finish. I decided on a knit-in-the-round design, as that was simplest, and I know many of you prefer knitting without seams (if you're still learning, this would be a great project for practice). I added stripes and a hood for extra cuteness, plus the opportunity to play with colour combinations.


I've written instructions for 3 sizes and 5 different ears/animals (4 are shown in the photo. The bear is not shown, as Lev claimed that one, and it's well-played with now). But it's super easy to customize the ears and face embroidery if you want something different - I bet a little person would be just as cute, with hair peaking out from under the hood!

I'm hoping to release the pattern very soon, but as always, it depends on when we can find time to get it all together (life with a toddler is never quiet). I hope you all like the new toy, and I really look forward to them popping up over on Ravelry!

Sunday, November 21, 2010

cozy elf tuque

We finally found a few hours to get this new hat pattern ready for you! You can buy it on Ravelry, Etsy, and Lulu. I don't know if the photos do the hat justice, as it is adorable in person, and so cozy and comfortable to wear. It's a simple design, but doesn't take much yarn, so go ahead and use some yummy fiber in a beautiful colour!

The hat is knit in the round, and you can easily use either double pointed needles or circular, depending on which you prefer. I've written it for 6 sizes, from infant to adult, so you have plenty to choose from. I also decided to include many sizes because the yarn you use can affect your gauge (I had that issue with the adult size). If it's a yarn new to you, it might be worth knitting a little swatch to make sure of the finished hat size.

I hope I've given you enough time to knit one or two before the cold weather arrives wherever you are!

Sunday, October 3, 2010

wee woodland wuzzies

The new pattern is now available! In the end, we have called it "Wee Woodland Wuzzies" which is a combination of your suggestions, Mr. Mitten's, and a slip of the tongue by me (I had meant to say "Fuzzies" but the alliteration was just too good). You can purchase it on Ravelry and Etsy, and I will add it to Lulu later today (we're on our way to a birthday party, and I've run out of time this morning).

The pattern includes instructions for 6 woodland animals: a squirrel, a mouse, a hare, a hedgehog, an otter, and a fox. The finished toys are about 3" tall, so they're great for little hands, or as decorations. They are all based on the same body pattern, with different heads/ears/tails. Each toy uses small amounts of worsted weight yarn*, so they are great for any scraps you have left from other projects. The patterns for the hat and scarf are also included, and they use fingering or sport weight yarn (if you don't knit socks, hit up one of your knitting buddies for a bit of left-over yarn).


I hope you enjoy this addition to the Fuzzy Mitten family!


As with any new pattern, there may be a few mistakes I've overlooked. Please let me know if you find anything, so I can make corrections to the pattern. 


*I’ve used worsted yarn for the toys because it is common in Canada and the US. The toys could easily be knit from DK, but you would need to go down a needle size for both the toys and the accessories

Wednesday, September 29, 2010

autumn animals

Another preview of my new design, this time showing all the little friends. The pattern includes instructions for 6 animals: mouse, squirrel, fox, hare, hedgehog, and otter. They all have the same body, but different heads/ears/tails to make each animal. The pattern also includes instructions for the hat and scarf. I'm hoping we can get it ready by the end of the week, so you haven't long to wait!

For photos of each animal, you can check my Flickr page.

Friday, August 6, 2010

test-knit alpaca

Thank you so much for all your kind comments about the new pattern! I hope all of you who bought a pattern already enjoy knitting your own alpacas.

I thought I would share with you the alpaca made by my test-knitter, ilovewool. You can see here she's wearing a lovely lacy dress while enjoying the summer flowers. While the dress can be knit in one colour, Maria chose to knit it in two (the pattern has instructions for both).


Here she is hanging out by a pool in her tankini. While Maria did knit a bikini top following the pattern, she also tried out her own version by adding some length to the bikini top. Perhaps if you ask her nicely on Ravelry, she will share how she modified the pattern.


And as a treat for all of you who continue to read my blog, even when I'm so busy, I'm giving away a free copy of the Alpaca pattern. Please leave a comment here (not on Facebook) telling me why you think alpacas are cute, or who you would knit one for. I'll choose a winner on Monday morning (Aug 9). As usual, please leave an email address, or check back here to see if you've won.

Happy weekend, everyone!

Wednesday, August 4, 2010

alpaca pattern is ready!

Finally! Finally the Alpaca pattern is done and ready for you. We're very sorry for the delay, but there is still a little bit of summer left for your alpaca toys to enjoy (if you get knitting right fast)! Although, if you live in the Southern Hemisphere, I guess you have plenty of time.


So here are a few details about the pattern. Like most of my toy patterns, this one is knit flat and seamed (although you could try to knit it in the round). The knitting techniques include knit, purl, several increases and decreases, and simple lace. You also need to make the hair, but that's pretty easy (there are diagrams in the pattern). The toy is made from worsted weight yarn, and the clothes from fingering weight. Because of the long neck, this toy is 9" tall, a bit bigger than my usual toys (but the other small clothes will still fit her).


You can find the pattern on Ravelry, Etsy, and Lulu*. If it's sold out on Etsy, I'll try to add more copies as soon as I can. Thanks so much for all your patience, and I hope you enjoy this new toy!

* The pattern costs more on Lulu because their fees are much higher than the other two sites. I will soon change all the pattern prices there, although the books will remain the same price at all my shops.  My hope is that Ravelry will make my shop public, so I can stop using Lulu for PDF sales.