Bunimals: Simple toys with many possible modifications
My new toy pattern, called Bunimals (bun+animals), was intentionally designed to be easy to modify into other types of animals. The pattern includes a variety of shapes with the ears and other appendages, while all the other details are kept as simple as possible. This way you can easily modify the pattern by changing the yarn colour or texture, mixing and matching the pieces, or making small alterations to the pieces provided, such as adding or removing length.
One simple modification is to change the yarn colour to better match the animal you want to make, such as using black and white to change the robin into a penguin. Another is to use the frog leg instructions to make legs to add to the other animals.
A more involved modification I tried was to use chunky weight yarn and 5 mm needles to make a larger toy. I used about 75 g of a single colour to knit the seal toy, and it turned out about 50 cm around and 10 cm tall (20"x4"). To make any of the two-colour designs in this way, make sure you have about 60 g of the MC and 15 g of the CC. You’ll also want safety eyes that are 15-18 mm in size.
Below I’ve described a few of the modifications that I imagined when designing the pattern (two I knit, the others I sketched for you), but I hope you use your creativity to make many more!
Cat pattern → Squirrel or Fox
Frog → Seal
To make a seal, you’ll need 50 g of white or grey yarn. Knit the whole body in your colour of choice. Then knit four leg pieces, but leave them un-stuffed. Two of these will be attached at the sides of the face as front flippers. To make the tail flippers, fold the other two leg pieces in half lengthwise, then place them on either side of the seam at the centre-back. Make sure the folded side faces up, and that you catch all the layers as you sew them onto the body. Embroider a V-shaped nose and wider mouth.
Mouse → Panda
To make a panda, you will need 40 g of white for your MC and about 10 g of black for your CC. Knit the body all in white. Before attaching the eyes, embroider small eye-patches with some black yarn, using a duplicate stitch technique. Knit the ears in black, and omit the pink duplicate stitch on the front. If you have enough black yarn, knit the legs from the frog pattern, and add them to the toy. Embroider a medium-size nose and a downward facing mouth.
Mouse → Koala
To make a koala, use grey for your MC and white for your CC, then knit the pieces as written. Embroider the front of the ears with your white yarn (if you have some fuzzy white yarn for this, even better). Embroider a large nose, positioned slightly above the centre of the eyes. A simple mouth works well for this toy.
Rabbit → Dog
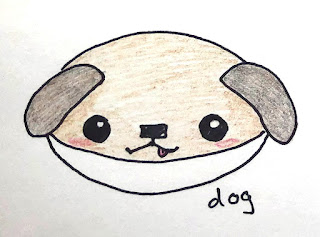
To make a dog, use a lighter brown yarn for your MC and white for your CC. If you like, use a dark brown or fuzzy yarn for the ears. Knit the body and ears as written, but exclude the tail. Attach the ears to the head so they hang down beside the face. Or, attach the ears pointing up, then fold them forward and sew in place. After you embroider the nose and mouth with black yarn, embroider a little pink tongue.
For a tail, CO 10 sts with whichever yarn colour you like. Work in stockinette until the tail is about 7 cm (3”) long. Then cut the yarn, thread the end through the stitches, and pull tight to gather. Sew along the tail seam, but don’t add stuffing, so the tail will remain flexible. Attach the tail to the centre-back of the toy body.
Robin → Chick or Ducking
To make a chick or ducking, you’ll need 50 g of light yellow yarn, plus about 5 g of orange yarn. Knit the body, wings, and tail from the yellow yarn. For a chick, knit the beak from orange yarn. For a duckling, knit a second “tail” piece from orange yarn to make a bill, and add a bit of stuffing. Assemble the toy pieces as described in the pattern.
I look forward to seeing all the adorable toys you knit from this pattern, and please consider sharing any inspiring modifications you create.


No comments:
Post a Comment