Showing posts with label tutorial. Show all posts

Thursday, June 26, 2014

intarsia tutorial - tiger's face

My Tiger pattern uses some more advanced techniques, one of which is intarsia. I like this technique for creating face markings on my toys, so I thought I would share how I work intarsia colour changes in knitting.

The piece of knitting shown in the tutorial is the head from my Tiger pattern (available on Ravelry or Etsy). Before beginning Step 1, work Rows 1-19 of the piece.

Note that you can click on any of the photos to view them in full size for more detail.

Step 1: To add a new colour at the end of the row (white, in the photo below), fold the new yarn to make a loop, about 10 cm (4") from the end. Insert your right-hand needle to make the first stitch, and place the loop over the end of the needle. Knit this loop as your first stitch. (At the end of a row, the 2 yarn ends can be tied later to stop them from coming loose)

Step 2: Here I've worked the first section in white, and now I want to change to orange. I add the new colour yarn in the same way as described in Step 1. You want to make sure you leave a long enough end on the wrong-side that it will not come loose as you knit, and so you have to enough to weave in when you're done.

Step 3: I've now worked the middle section in orange, and I want to begin another section of white. You need to use a separate piece of yarn, because you are not carrying the white along behind the orange section.

Here I've finished Row 20, and you can see the three sections of colour. (The loose yarn ends are hidden behind, and you see the three I am working with).

Step 4: I've begun Row 21, working the first white section. When I come to the place where I need to change yarn colours, I lay the first yarn (marked with blue dots) over top of the yarn I need next (marked with green dots). This way, when I pick up the orange yarn to purl the next stitch, the two yarns are twisted together. This prevents holes in the piece as you change colours.

Step 5: I've worked the orange section of Row 21, and now I'm changing to white again. You can see where the orange yarn I just used (marked with green dots) is twisted with the yarn I'm using to make the next stitch (marked with blue dots).

Step 6: I've finished Row 21, and worked Row 22. This photo shows Row 23, where I am changing from white to orange. You can see how the two colours were twisted together in previous rows. This makes a sort of seam between the two sections of colour. Practice will help you maintain an even tension as you change colours.

Here I have completed the 6 rows of intarsia. The right side looks nice and tidy. If your tension is not quite even, you can try gently pulling on the stitches with your needle tip, to even out the tension over the row. Blocking will also help. If it is very uneven, it is worth a little extra time to redo it, and get some more practice (I've done this a lot!)

Here is the piece from the wrong side. You can see more clearly now where the two yarn colours are twisted together. This simple technique is how I work intarsia.

In this photo, I've worked the last row of the head, cut the yarn, and threaded the end through the stitches to gather them together. It's looking a little more like the tiger's head now.

Step 7: Before you can finish the head, you need to weave in the yarn ends from the intarsia sections. If done incorrectly, you will get holes on the right side. A good way to start is to make a short stitch to the side of your yarn end, in the direction of the next colour. Check on the right side, to make sure any holes have been closed. 

Step 8: Then weave in the yarn end securely, using your preferred method. I like to thread the end along a row of purl stitch bumps, working towards the side of the piece. Then I can tie them off as I sew the seam. Other ends are woven in so they won't show on the right side.

Now you can attach safety eyes or buttons, sew up the seam, and stuff the head. 
Some other tutorials that might be useful: soft sculpture to give the face more character, and how to embroider the nose and mouth.

Here is what the finished toy will look like! I hope you've found this tutorial useful. If you want more help with this technique, there are many video tutorials. A search for "intarsia knitting" should find something that works for you.


Friday, April 11, 2014

Silly Duck Tutorial - Part 2

This is the second technique which may be helpful in finishing the feet of your Silly Duck (here's Part 1).

Part 2: Sewing the Foot Together

Step 1: Sew together the cast-on edge, then part-way up the back seam. 

Step 2: Add a small amount of stuffing to the leg. There should be no stuffing in the foot. Finish sewing the back seam, and weave in this yarn end.

Step 3: Flatten the foot, so the leg is towards the back, and the foot is symmetrical. Use a safety pin to hold the two layers of the foot together.

Step 4: Cut a 25 cm (10") length of yarn the same colour as the foot and thread it onto your needle (I'm using a contrasting colour so you can see my stitches). Insert the needle at the center-bottom of the foot, and exit to one side of the center-top of the foot. Leave about 7 cm (3") of yarn where you started.

Step 5: Using a running-stitch, make 2 short stitches towards the edge of the foot, following a column of stitches to keep your line straight. End on the underside of the foot.

Step 6: Make a stitch around the edge of the foot, then work back towards the center of the foot, making a stitch between your first 2 stitches. Exit on the other side of the center-top.

Step 7: Stitch a line on the other side of the foot, just like the first. 

Step 8: Thread your yarn to where you began, and knot your yarn ends together. Weave the ends through the foot 2-3 times, pulling on the knot so it slips inside the foot. Your yarn ends should now be secure.

Here is the finished foot, with the stitching done in the correct colour. You can see that it's nearly invisible, and the foot now has the right shape. Maybe they're a bit rounder than real duck feet, but perfectly cute for a silly toy duck!


Silly Duck Tutorial - Part 1

While my Silly Duck pattern (Ravelry, Etsy) is not a difficult pattern, there are a couple key places where your finishing skills make all the difference in the success of your efforts. I've put together two photo tutorials to show you how I attach the duck's beak, and how I finish the feet.

Part 1 - Attaching the Beak

Step 1: The head has been stuffed (the arrow shows the seam). The beak has been seamed, and stuffed. There is very little stuffing in the beak - just enough to hold it's shape. Note that there are 2 yarn ends attached to the beak - one from the cast-on, and one from sewing the seam. These will be used to attach the beak.

Step 2: Line up the beak to where you will sew it to the head. The dots show where to match up the center and sides of the beak. The sides match up with the decreases you made on Row 20.

Step 3: Use safety pins to pin in the beak in place.

Step 4: On the underside of the head, the beak seam will match up with the head seam. The underside of the beak will be a straight line between the sides (don't pull it down so it's curved). A shoulder / invisible seam stitch works best to attach the beak. 

Step 5: Start at the center seam with one yarn end, and work towards one side of the beak. Start at the center seam with the second yarn end, and work towards the other side of the beak.

Step 6: Turn the head over, and use the same method to sew the upper-side of the beak to the head. You may find it easier to make a couple stitches at a time on each side, to get a more symmetrical placement.

Step 7: The beak is now attached to the head. Thread both yarn ends to the same location, and knot them together. Weave the ends through the head 2-3 times, pulling on the knot so it slips inside the head. Your yarn ends should now be secure.

Finished head from the front. I've done some soft-sculpture, like I show in this post.

Finished head from the side. With only a small amount of stuffing in the beak, it has a more realistic shape.


Friday, March 14, 2014

Tutorial - soft sculpture for the head

A long time ago I wrote a brief tip describing how I use soft-sculpture to enhance the shape of the heads of my toys. While stuffing is the most important step in shaping any toy, soft-sculpture will reinforce the shape, and help maintain it if the toy is played with. It also adds a lot of character to your toy's face. Below is a photo tutorial showing my technique for sculpting around the eyes. I hope you find it useful!

Here is the head from the front, with safety eyes attached, then stuffed and sewn closed. You can see that I've added some extra stuffing to the cheeks and nose, so the head is not just a round ball.

Here is the head from the side. If you are using buttons or felt instead of safety eyes, attach them first before doing any soft sculpture to the head.

Step 1: To begin, cut a length of your main-colour yarn (about 30 cm or 12"), and thread it onto a sharp needle. (I've used a long, sharp darning needle, which is a good tool to own if you're making several toys.) Insert the needle at the center-bottom, through the seam (shown with the arrow).

Step 2: Have the needle exit the head near the first eye, towards the nose and in line with the lower edge of the eye. Pull the yarn through, leaving a 3" tail where you began.

Step 3: Insert the needle again below the center of the eye, making a short stitch (about 1 cm or 3/8"). Have the needle exit at the bottom of the head where you began.

Step 4: Gently pull on the yarn attached to your needle, making sure not to pull through your yarn end. This will make a dent in the head below the eye, and make the cheek seem to stick out more. 

Step 5: When you are happy with the shape of the head, tie your yarn in a knot with the short yarn tail. Do not cut the yarn yet, but repeat the same steps to shape the other side of the head.

Step 6: Once you are happy with the shape of the head, make sure your knots are secure, and trim the yarn ends to about 2.5 cm or 1". These ends will be hidden when you attach the head to the body. Now you can embroider the nose and mouth, and attach the ears.


The method shown above will change the direction that the eyes face, so they seem to be more on the sides of the head. This technique works well for animals like rabbits, otters, beavers, and other animals with longer faces. If your toy has forward facing eyes, like a cat, a dog, or a monkey, try the slightly different method below.

Follow Steps 1-2 as shown above. When you get to Step 3, insert your needle in front of the eye, as shown in the photo below. Complete Steps 4-6 as described above.

You can see that the eyes point forward now, giving the face a different look. If you want the nose/muzzle more pronounced, you can use the same method to make another stitch between the eyes, and in line with the other two. I did this on my Big Teddy.


I use this technique on most of my toys. It's simple and quick, and can make a big difference in the appearance of any toys you knit. The sample used in the photos is the head from the Well-Dressed Bunny, but you can adapt it for any of my patterns. I used this technique on my Bunny Puppets, which is my featured pattern for March. Try it out, if you're knitting a bunny puppet!


Sunday, June 16, 2013

wee dragon

Here is a fun modification of my Wee Woodland Wuzzies pattern: a Wee Dragon! To make this toy, you will need a copy of that pattern *, plus the Dragon and Friends pattern for the wings (or some felt).


Materials
20 g of worsted weight yarn in variegated green (or whatever colour you want your dragon), 15 g of fingering weight yarn in light green (or green felt), 3 and 4 mm (US size 2.5 and 6) knitting needles, polyester stuffing, a pair of 6 mm safety eyes, yarn to embroider the face, tapestry needle, hand-sewing needle and thread (if you make the wings from felt)

Use the worsted weight yarn and 4 mm needles for the Body, Head, and Tail.

Body
Work the body from the Wee Wuzzy pattern with the following mods:
After Row 10, work 5 rows of st st, instead of 3 rows.
After Row 14 (second set of bobbles), work 5 rows of st st, instead of 3 rows.

Head
Work the head from the Wee Wuzzy Mouse, ignoring the colour changes. Alternatively, work one of the other animal heads, if you would like your dragon to have a shorter or longer nose.

Tail
Work the tail from the Wee Wuzzy Otter, adding 3 more rows of st st after row 16.

Stuff and assemble the toy as written in the Wee Wuzzy pattern. Embroider a mouth, nose, and some teeth on the dragon's face. You can also add extra details like claws and eyebrows.

Wings
Using the fingering weight yarn and 3 mm needles, make the wings from the Dragon pattern. Alternatively, cut 2 wings from felt, and sew them onto your dragon's back with the hand-sewing needle and thread.

I also used my questionable crochet skills to add this little ridge down the back (sorry I can't elaborate, I just mess around with a hook and yarn until it looks about right).
Bye-bye wee dragon!

*If you don't have both patterns, and would rather buy the Dragon pattern, you could use my free Holiday Mice pattern for the body and head, and improvise a tail - start with 15 sts, and gradually decrease to 5, over about 20 rows.

P.S. I'm going to start adding the "patternmods" label to the posts which fit under that category, so they're easier to find. But they will all still have the "tutorial" label as well, if you are used to finding them that way.

Wednesday, April 3, 2013

fabric dress tutorial

In the past I've made simple fabric dresses for some of my toys, because I love to sew, and I like the combination of materials. I've put together this tutorial to show how I make them, in case any of you love to sew as well. This dress will fit any of my 8-9" tall toys.

If you have any questions, please leave a comment and I will update this post to address them. If you're having trouble seeing details in the photos, clicking on one should open the full-size version.

Materials: 12" x 6" of quilting weight cotton fabric, 10" length of 3/8" wide elastic, all-purpose thread to match your fabric.
Tools: a sewing machine, scissors, ruler, straight pins, iron, bodkin or safety pin, pencil or chalk to mark fabric.

Notes: While this tutorial is fairly simple, you will need basic machine sewing skills. Ironing and clipping threads between steps will make for a nicer finished garment. Always back-stitch at the beginning and end of straight seams to secure the thread.

Step 1: cut your piece of fabric into two 6" x 6" squares.

Step 2: Mark which edge will be the top. Mark the sides, 4" up from the bottom. Make sure you mark both pieces of fabric.

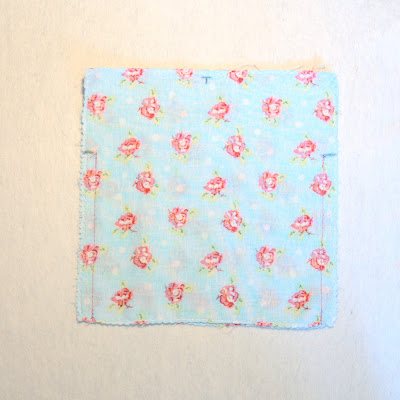
Step 3: Zig-zag around all four sides of each piece, separately, in order to finish the edges. Then place the two pieces with right sides facing each other, and match up the marks you made in Step 2. Pin the sides together.

Step 4: Sew a 3/8" wide seam along one side, from the bottom up to your mark. Repeat for the other side.

Step 5: Press the seams open, from the bottom to the top of the dress. You will have a slit at the top of each side - they will become the arm-holes.

Step 6: Starting at the top left, sew down the slit on one side, pivoting around your needle when you reach the seam at the bottom of the slit, then sew up to the top again. (I've sewn about 1/4" from the edge) Repeat for the other slit.

Step 7: Fold down the top 5/8" to make a casing. Pin in place and press. Repeat on the other side.

Step 8: Sew down the casing 1/2" from the top edge. Repeat for the other side.

Step 9: Fold up the hem 5/8" all the way around, pin in place and press. Sew down the hem 1/2" from the bottom edge.

Step 10: Turn dress right side out. Using the bodkin or safety pin, thread elastic through one casing, then through the other, ending on the same side where you started. (I've used ribbon to demonstrate, as it was easier to see).

Step 11: Cinch the elastic around the neck-opening, until it's the right size to fit around the neck of the toy, but loose enough to stretch over the head. It will help to have a finished toy handy. Tie a tight square knot. Cut the elastic ends about 1/4" long, then tug on the elastic until the knot is hidden in the casing.

Step 12: Dress your toy.