
A year ago today, I wrote this blog post. Reading that second paragraph, I should have know at the time I was tempting fate, wishing that Baby Mitten wouldn't show up in the middle of the holidays. I went into labour that evening, and Lev was born at 12:30 am on December 12. He was 5 weeks early, so tiny and scrawny, but so full of life that we knew everything would be okay.
Sadly, the first 2 weeks of his life were spent in the hospital, so I never did get to enjoy our Christmas tree. Although, the Christmas baking I did was a nice addition to hospital food (my pre-labour fit of nesting was to make 4 dozen mincemeat tarts!). It was such a relief to finally get him home, and make a start at fattening him up. You can see that by the summer, he was doing just fine!
It's so hard to believe that a whole year has gone by, and he's grown up into such a personality. A little bit of both of us, and a lot of his own goofy style. Getting a video camera was a brilliant idea, since photos could never quite capture some of the amazing moments of Lev's first year. Despite all the bad days (and nights) those moments of joy, silliness, and love sparkle in my memory.
Balancing work, learning how to be a mom, and making time to be a wife, has made this year challenging in many ways. I've changed so much, and those changes often came with a lot of tears: worrying that I wouldn't be good enough, might make the wrong choices, or lose myself in this new role. But now that I've made it through this first year, I think I've done okay, and I'm satisfied with the kind of mother I am to Lev. Seeing him happy, healthy, and learning so quickly, I know I must be doing something right (not to at all diminish how wonderful a father Mr. Mitten is).
Often work has lost out, although I could never regret the time I've spent taking care of my little one. I think this next year is going to bring a lot of changes to Fuzzy Mitten (good ones, never fear). I feel the need to take some different directions, branch out, and test the skills I've learned over the past 3 years. Keeping up with a toddler while trying to do all that is going to be a challenge, but I think I can make it fun if I keep my goals in mind, and take time to enjoy all the little happy moments he gives me.
Friday, December 11, 2009

Wednesday, December 2, 2009
pocket mouse
Mouse
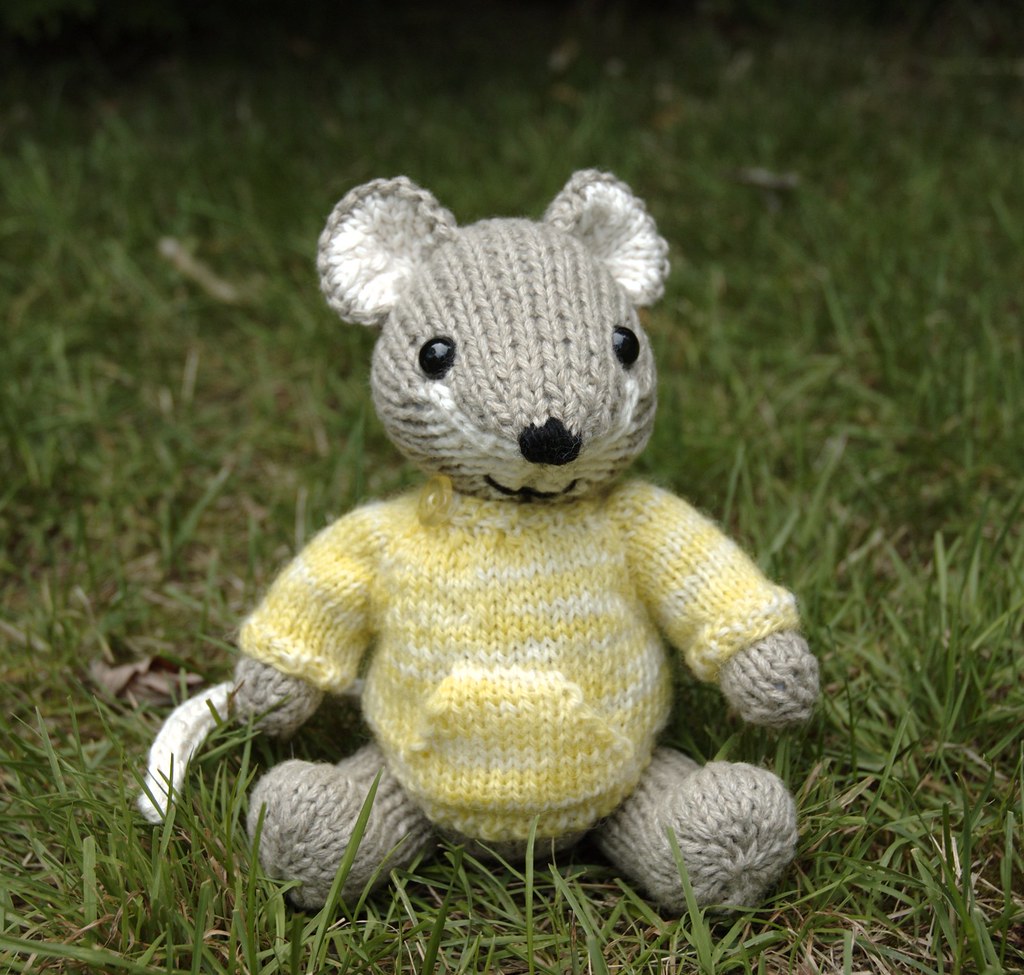
The previous content of the post has been removed, because it was causing confusion over whether or not the pattern was actually free. If you would like to knit this toy, you can find the pattern on Ravlery, Etsy, or in my Fuzzy Knits collection.
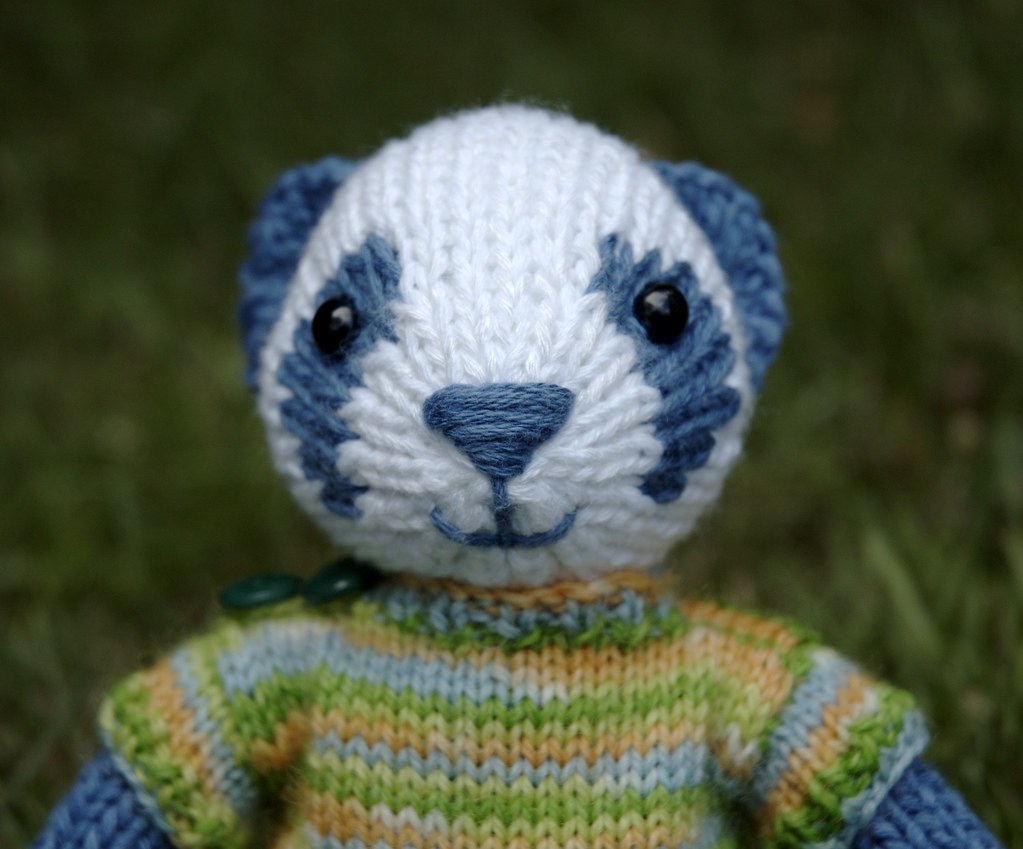
Panda cuteness
Panda
so hard to write...
It gives me great pain to admit this, but the new edition of Fuzzy Knits will not be ready before the holidays. It's been upsetting me so much that it's taken this long, and I finally had to admit that the stress wasn't healthy for me, and might compromise the quality of my work. This Autumn has been so much busier than I imagined, with Lev running headlong into toddler-hood, and Mr. Mitten working overtime at a new and more demanding day-job.
We really want to take the next few weeks to enjoy the holiday season, visit with family, and wind down from such a hectic few months. (I hope you have the same opportunity.) Then we can get back to work in the new year, and with luck, get the book ready for the next big holiday season. With the pressure off, we should be able to give you the quality of book you deserve.
If you were thinking of giving the new book as a gift this holiday, perhaps you could consider the Festive Knits book instead. If you live in the US, you should even have a little time to order a printed copy. Or, if you don't mind a bit of do-it-yourself craftiness, you can order the download (Ravelry link), print the book out at home, and put it all together into a nice binder. With a bit of yarn and some other supplies for a toy or two, it would make a great gift for a knitter who loves cute critters!
However, I know a few of you were counting on the new toy versions to complete some gifts, and I don't want to let you down. The two posts following this one will have the instructions for the head and ears of the new Mouse and Panda. You will still need to use the original patterns to complete the toy, but I haven't changed these much in the new versions, so you should still get a very adorable toy.
We really want to take the next few weeks to enjoy the holiday season, visit with family, and wind down from such a hectic few months. (I hope you have the same opportunity.) Then we can get back to work in the new year, and with luck, get the book ready for the next big holiday season. With the pressure off, we should be able to give you the quality of book you deserve.
If you were thinking of giving the new book as a gift this holiday, perhaps you could consider the Festive Knits book instead. If you live in the US, you should even have a little time to order a printed copy. Or, if you don't mind a bit of do-it-yourself craftiness, you can order the download (Ravelry link), print the book out at home, and put it all together into a nice binder. With a bit of yarn and some other supplies for a toy or two, it would make a great gift for a knitter who loves cute critters!
However, I know a few of you were counting on the new toy versions to complete some gifts, and I don't want to let you down. The two posts following this one will have the instructions for the head and ears of the new Mouse and Panda. You will still need to use the original patterns to complete the toy, but I haven't changed these much in the new versions, so you should still get a very adorable toy.
Monday, November 30, 2009
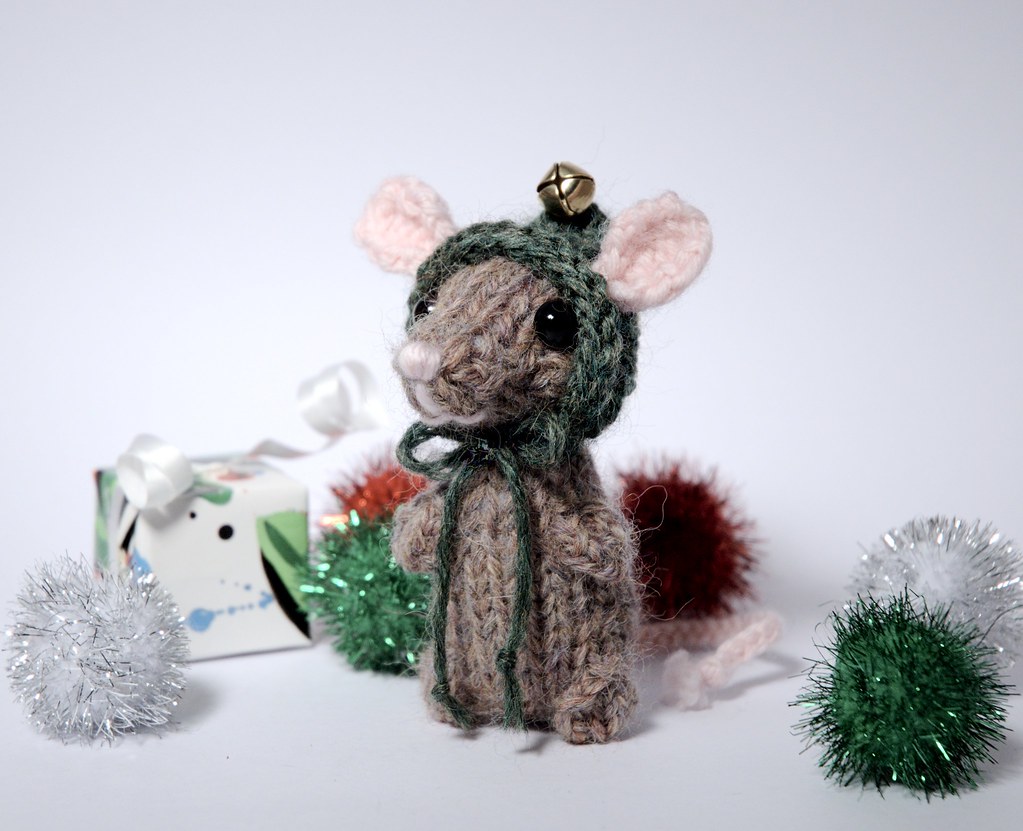
holiday mouse pattern
I can hardly believe some of you have already knit my Holiday Mouse pattern (some people have made more than one)! They are all very cute, so you should try it! In order to make it easier for you to work on the project away from your computer, Mr. Mitten has made the pattern into a PDF file. You can download it directly, or get it on Ravelry. These wee guys take almost no time at all, and very little yarn, so they won't add too much to your holiday knitting list ;o)
Wednesday, November 25, 2009
Holiday Mice
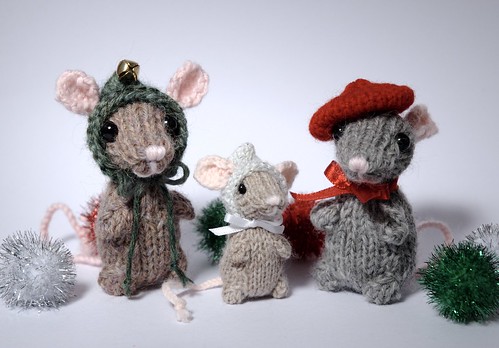
Wow, I must have been really inspired, because the pattern is done and ready! Of course, these little fellas only take a couple of hours to make. Not to waste any time, on to the details!
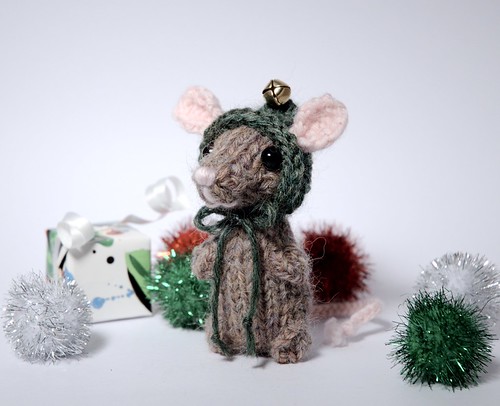
You can knit the mice flat on straight needles, or in the round (the brown ones are knit flat, the grey one in the round, so you can see there is little difference). The materials list says to use worsted weight yarn because that's what I usually use. The larger mice are made with worsted weight yarn, but the little one is made with sport weight yarn on 3 mm needles (he's only 2" tall), so you can really use whatever you have. The hood is knit flat with a seam up the back, and the beret is knit in the round, so you can make whichever you are comfortable with. Little details like bells, pom-poms, and ribbon bows are optional, but very cute!

Since this pattern has not been test knit, please let me know if there are any mistakes, so I can correct the pattern.
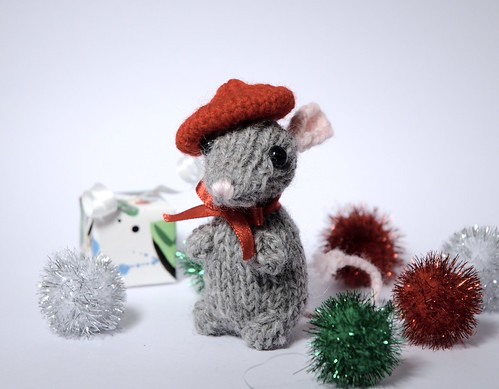
Holiday Mouse
Materials: 15 g worsted weight yarn in main colour (MC), 10 g of worsted weight yarn in contrasting colour (CC), small amount of pink worsted weight yarn, stuffing, pair of 8 mm safety eyes or buttons (or black yarn), 4 mm (US size 6) set of dpns or pair of needles, tapestry needle
Size: 8 cm (3")
Gauge: 22 sts and 32 rows per 10cm (4˝) in st st
Notes: Instructions are written for knitting flat with straight needles. To knit the toy in the round on dpns, knit all odd rows, rather than purling them (except for bobbles). Please note that you may need to shuffle sts between needles occasionally, in order to work the increases and decreases. Remember to attach safety eyes and stuff head before working Row 16.
MB = Make Bobble
Row 1: increase 5 sts into next st (knit into front, then back, front, back, front of st). (5 sts)
Row 2: p5, turn.
Row 3: k5, turn.
Row 4: p2tog, p1, p2tog, turn. (3 sts)
Row 5: s1, k2tog, psso. (1 st)
Then continue with pattern...
Body
Start at bottom. Cast on 7 sts with MC.
Row 1: P 1 row.
Row 2: k1, [m1, k1] x 6. (13 sts)
Row 3: P 1 row.
Row 4: k3, [m1, k1] x 7, m1, k3. (21 sts)
Row 5: P 1 row.
Row 6: k7, MB, k5, MB, k7.
Row 7-9: work 3 rows in st st.
Row 10: k6, k2tog, k5, skpo, k6. (19 sts)
Row 11-13: work 3 rows in st st.
Row 14: k6, MB, skpo, k1, k2tog, MB, k6. (17 sts)
Row 15-17: work 3 rows in st st.
Row 18: k2, [skpo] x 3, k1, [k2tog] x 3, k2. (11 sts)
Bind off. Cut yarn. Sew up back seam, leaving bound-off edge open. Stuff body.
Head
Start at back. Cast on 6 sts with MC.
Row 1: P 1 row.
Row 2: k1, [m1, k1] x 5. (11 sts)
Row 3: P 1 row.
Row 4: k2, [m1, k1] x 3, k1, [k1, m1] x 3, k2. (17 sts)
Row 5-9: work 5 rows in st st.
Row 10: k2, skpo, k1, k2tog, k3, skpo, k1, k2tog, k2. (13 sts)
Row 11: P 1 row.
Row 12: k3, k2tog, k3, skpo, k3. (11 sts)
Row 13: P 1 row.
Row 14: k2, k2tog, k3, skpo, k2. (9 sts)
Row 15: P 1 row.
Row 16: [k2tog] x 2, k1, [skpo] x 2. (5 sts)
Cut yarn, thread end through remaining sts, and pull tight to gather. Attach safety eyes. Sew seam, leaving an opening. Stuff head, adding extra stuffing to cheeks. Sew closed.
Hood
Start at front. Cast on 22 sts with CC yarn and straight needles.
Row 1: K 1 row.
Row 2: skpo, k18, k2tog. (20 sts)
Row 3: k2, p16, k2.
Row 4: skpo, k16, k2tog. (18 sts)
Row 5: k2, p14, k2.
Row 6: K 1 row.
Row 7: k2, p14, k2.
Row 8: k8, m1, k2, m1, k8. (20 sts)
Row 9: k2, p16, k2.
Row 10: k9, m1, k2, m1, k9. (22 sts)
Fold hood in half and graft together back from neck to point. Or, work one more wrong side row, then bind off, and sew back seam of hood. Add a couple lengths of yarn or ribbon to front corners for ties. If you like, add a pom-pom or bell to the hood point.
Beret
Cast on 18 sts with CC yarn and dpns. Join in the round.
Row 1-2: [k1, p1] x 9.
Row 3: [k2, m1] x 9. (27 sts)
Row 4-8: work 5 rows in st st.
Row 9: [k1, k2tog] x 9. (18 sts)
Row 10: K 1 row.
Row 11: [k2tog] x 9. (9 sts)
Row 12: K 1 row.
Row 13: [k1, k2tog] x 3. (6 sts)
Cut yarn, thread end through remaining sts, and pull tight to gather. Secure yarn ends.
Ears (make 2)
Ears must be knit flat.
Cast on 3 sts with pink yarn.
Row 1: P 1 row.
Row 2: [k1, m1] x 2, k1. (5 sts)
Row 3: P 1 row.
Row 4: k1, m1, k3, m1, k1. (7 sts)
Row 5: P 1 row.
Row 6: k1, [k2tog] x 3. (4 sts)
Bind off.
Finishing
If you're not using safety eyes, sew on button eyes, or embroider them with black yarn. Embroider a nose with pink yarn. Sew bound-off edge of ears to head or hat. Sew head to bound-off edge of body. Sew hat onto head (add a bit of stuffing to the hat if you like). For the tail, make a braid or a length of I-cord from pink yarn. If you're hanging the mouse on a tree, add a loop of yarn to the top of the head. If the mouse will be a toy, you may want to sew down the sides of the bobble feet.
Abbreviations
K or k = knit
k2tog = decrease 1 by knitting 2 together
m1 = increase 1 by picking up loop between stitch just worked and next stitch, and knit into the back of this loop
P or p = purl
p2tog = decrease 1 by purling 2 together
skpo = slip 1, knit 1, pass slipped stitch over
st or sts = stitch or stitches
st st = stocking stitch
Monday, November 23, 2009
holiday pattern poll results
Thanks so much for all your ideas, and for participating in the poll. Although I had planned to just let your ideas and votes point me in the right direction, and let my creativity go from there, the mouse had such a clear majority I've decided to design that. There were lots of other interesting ideas, and lots of support for those too, so a few of them might get worked into future patterns.
I've got a little start on writing the pattern, and now it's time to get out my needles and yarn. If all goes well, the pattern should be ready for you within the next week. Just in time for you to make one or two for holiday decorating!
I've got a little start on writing the pattern, and now it's time to get out my needles and yarn. If all goes well, the pattern should be ready for you within the next week. Just in time for you to make one or two for holiday decorating!
Subscribe to:
Posts (Atom)